Food and Beverage
Elija Cereales Integrales para Tener un Corazón Sano

Last Updated on July 14, 2024 by Daily News Staff
(Family Features) Comer sano es una prioridad para muchos estadounidenses, pero saber por dónde empezar y con qué alimentos puede ser un poco complicado. Una forma de aumentar el valor nutricional de sus comidas es conocer mejor los granos integrales y comprender por qué son importantes para tener un régimen de alimentación saludable para el corazón.
Como elementos clave de un régimen de alimentación beneficioso para el corazón, los cereales integrales como el sorgo, la avena y el arroz integral son fuentes ricas en fibra dietética, pueden mejorar los niveles de colesterol en la sangre y proporcionar nutrientes que ayudan al cuerpo a formar nuevas células, regular la tiroides y mantener un sistema inmunológico saludable.
Sin embargo, según una encuesta realizada por The Harris Poll en nombre de la American Heart Association, los adultos estadounidenses tienen menos conocimientos sobre los granos refinados frente a los integrales en comparación con otras categorías de alimentos como las frutas, las verduras y las proteínas. Además, cuando se les pidió que identificaran los granos integrales y los granos refinados, nos encontramos con que la mayoría de los adultos cree incorrectamente que el pan multigrano es un pan con granos integrales y solo el 17 % cree que el sorgo es un ejemplo de grano integral cuando, de hecho, es una opción nutritiva de grano integral.
Si está buscando probar más granos integrales, el sorgo es un ingrediente principal en estas recetas saludables para el corazón de panqueques con salsa de vainilla y arándanos,muffins streuselde frambuesa y salteado de sorgo con verduras de la huerta. Estos sabrosos platos pueden ser parte de un régimen de alimentación saludable en general, según lo recomendado por la iniciativa Healthy for Good de la American Heart Association, respaldada por Sorghum Checkoff.
Encuentre más ideas de comidas saludables para el corazón en Heart.org/healthyforgood.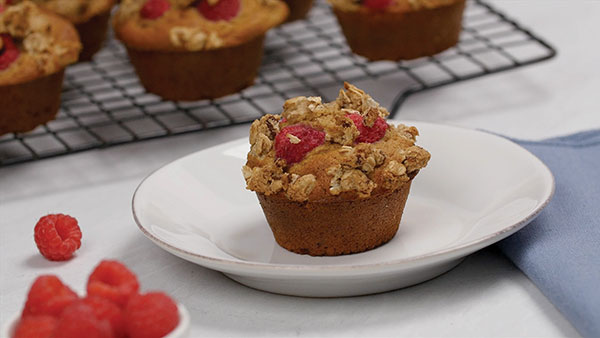
Muffins Streusel de Frambuesa
Receta cortesía de la American Heart Association y Sorghum Checkoff
Porciones: 12 (1 muffin por porción)
Muffins:
- Aceite en aerosol antiadherente
- 1 1/2 tazas de harina de sorgo integral
- 1 cucharadita de canela molida
- 3/4 cucharadita de bicarbonato de sodio
- 3/4 taza de suero de leche descremada
- 1/3 taza de azúcar rubia bien compactada
- 3 claras de huevo grandes
- 1/4 taza de aceite de canola o de maíz
- 2 cucharaditas de ralladura de limón
- 1 cucharadita de extracto de vainilla
- 1 taza de frambuesas sin azúcar frescas o congeladas, descongeladas si están congeladas
Streusel:
- 2 cucharadas de harina de sorgo integral
- 2 cucharadas de azúcar rubio
- 2 cucharadas de copos de avena de cocción rápida sin cocer
- 2 cucharadas de nueces pecanas picadas
- 2 cucharadas de margarina blanda de bajo contenido graso.
- 1/2 cucharadita de canela molida
- Para hacer los muffins: Precalentar el horno a 400 °F. Rociar ligeramente un molde para muffins de 12 tazas con spray antiadherente para cocinar.
- En un tazón grande, mezclar la harina de sorgo, la canela y el bicarbonato de sodio.
- En un tazón mediano, batir el suero de leche, el azúcar moreno, las claras de huevo, el aceite, la ralladura de limón y la vainilla. Agregar la mezcla de harina hasta que la masa esté apenas humedecida y no quede harina sin mezclar. Colocar la masa en moldes para muffins. Cubrir cada muffin con frambuesas.
- Para hacer el streusel: En un tazón pequeño, mezclar la harina de sorgo, el azúcar rubia, la avena, las nueces, la margarina y la canela para lograr una textura de migas gruesas. Espolvorear sobre los panecillos, empujando suavemente hacia la masa. Hornear durante 16 minutos o hasta que al insertar un palillo de madera en el centro, éste salga limpio. El USDA recomienda cocinar los platos que tengan huevo a 160 °F.
- Colocar la bandeja en la rejilla para enfriar. Dejar reposar 5 minutos. Con cuidado transfiera los muffins a la rejilla. Dejar enfriar por completo, unos 20 minutos.
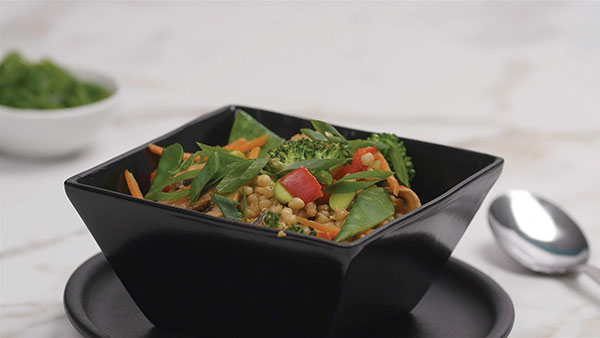
Sorgo Salteado con Vegetales de la Huerta
Receta cortesía de la American Heart Association y Sorghum Checkoff
Porciones: 4 (1 1/2 tazas por porción
- 1 taza de sorgo integral crudo
- 2 cucharaditas de aceite de sésamo tostado
- 2 dientes de ajo medianos, picados
- 1 cucharadita de raíz de jengibre, pelada y picada
- 1 taza de floretes de brócoli frescos o congelados, picados, si están congelados descongélelos
- 1 taza de tirabeques, cortados y partidos por la mitad
- 1/2 taza de tiras de zanahoria, cortadas en palitos
- 1/2 taza de pimiento rojo, cortado en cubitos
- 1/2 taza de champiñones, en rodajas finas
- 1/2 taza de edamame sin cáscara congelado, descongelado
- 2 huevos grandes
- 2 cucharadas de salsa de soja baja en sodio, cantidad dividida
- 1/2 taza de castañas de agua, enjuagadas y escurridas
- 1/4 taza de cebollas verdes, rebanadas en diagonal
- Prepare el sorgo siguiendo las instrucciones del paquete, no le ponga la sal. Una vez cocido, extienda el sorgo en una capa uniforme sobre una bandeja para hornear con borde o una fuente para hornear de 13 por 9 por 2 pulgadas. Deje reposar de 5 a 10 minutos a temperatura ambiente. Refrigere, sin tapar, 20 minutos o hasta que se enfríe.
- En una sartén antiadherente mediana a fuego medio, caliente el aceite, y asegúrese de cubrir el fondo. Cocine el ajo y la raíz de jengibre durante 30 segundos, revuelva con frecuencia. Aumente el fuego a medio-alto. Cocine el brócoli, los guisantes, las zanahorias, el pimiento, los champiñones y el edamame de 10 a 12 minutos, o hasta que las verduras estén tiernas pero crujientes, revuelva con frecuencia.
- En un tazón pequeño, con un tenedor, bata los huevos y 1 cucharada de salsa de soja.
- Reduzca el fuego a bajo. Agregue las castañas de agua y el sorgo a la mezcla de verduras. Empuje la mezcla a los lados de la sartén. Vierta la mezcla de huevo en el centro de la sartén. Use una espátula de goma resistente al calor y revuelva de 1 a 2 minutos o hasta que esté parcialmente cocido.
- Mezcle las verduras en el huevo parcialmente cocido. Cocine 1 minuto, o hasta que los huevos estén bien cocidos y el sorgo esté bien caliente, revuelva constantemente. El USDA recomienda cocinar los platos que tengan huevo a 160 °F.
- Retirar del calor. Agregue la salsa de soja restante. Espolvoree con las cebollas verdes.
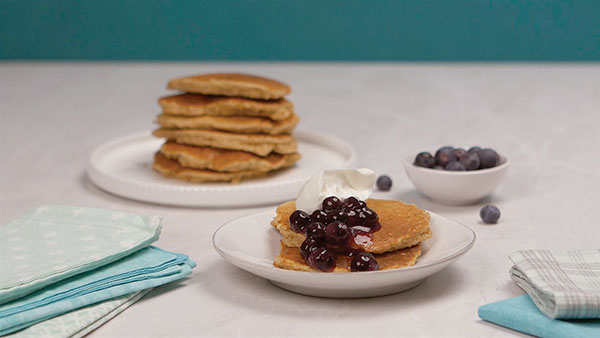
Panqueques con Salsa de Vainilla y Arándanos
Receta cortesía de la American Heart Association y Sorghum Checkoff
Porciones: 4 (2 panqueques, 1/4 taza de salsa y 2 cucharadas de yogur por porción)
Salsa:
- 2 cucharadas de maicena
- 1/3 vaso de agua
- 1 taza de arándanos
- 1 cucharada de azúcar
- 1 1/2 cucharaditas de extracto de vainilla
Panqueques:
- 1/2 taza de copos de avena de cocción rápida
- 1/2 taza de harina de sorgo integral
- 1 1/2 cucharadas de azúcar rubia bien compactada
- 1 1/2 cucharaditas de polvo de hornear
- 1/2 cucharadita de canela molida
- 1/2 taza de leche descremada
- 1/2 taza de puré de manzana sin azúcar
- 1 huevo grande
- 1 cucharada de aceite de canola o de maíz
Cobertura
- 1/2 taza de yogur griego natural descremado
- Para hacer la salsa: Poner la maicena en una cacerola mediana. Agregar agua y revolver para disolver la maicena. Agregar los arándanos y el azúcar. Llevar a ebullición a fuego medio-alto. Hervir 1-2 minutos, o hasta que la salsa se espese un poco. Retirar del calor. Agregar la vainilla. Taparlo para mantener el calor. Reservar.
- Para hacer los panqueques: En un tazón mediano, mezclar la avena, la harina de sorgo, el azúcar morena, el polvo de hornear y la canela.
- En un tazón pequeño, batir la leche, el puré de manzana, el huevo y el aceite. Agregar la mezcla de harina hasta que la masa esté apenas humedecida y no quede harina sin mezclar.
- Calentar la plancha antiadherente a fuego medio. Probar la temperatura rociando gotas de agua en la plancha. La plancha está lista cuando el agua se evapora rápidamente.
- Verter 1/4 taza de masa para cada panqueque en la plancha. Cocinar de 2 a 3 minutos, o hasta que aparezcan pequeñas burbujas en la superficie y la parte de abajo esté dorada. Dar vuelta los panqueques. Cocinar de 1 a 2 minutos, o hasta que esté completamente cocido y tenga la base dorada. El USDA recomienda cocinar los platos que tengan huevo a 160 °F.
- Colocar los panqueques en los platos. Verter la salsa sobre los panqueques. Cubrir cada porción con 2 cucharadas de yogur.
SOURCE:
American Heart Association
At our core, we at STM Daily News, strive to keep you informed and inspired with the freshest content on all things food and beverage. From mouthwatering recipes to intriguing articles, we’re here to satisfy your appetite for culinary knowledge.
Visit our Food & Drink section to get the latest on Foodie News and recipes, offering a delightful blend of culinary inspiration and gastronomic trends to elevate your dining experience.
https://stmdailynews.com/category/food-and-beverage
You can also find food and beverage-related videos on our YouTube channel, where we regularly post new content and share tips, recipes, and demonstrations. https://youtube.com/playlist?list=PLEhXBupt8tVynuUhpQZMxQt4lvPmOiAtQ&si=InDwc7YaB0KIwmxy


Food and Beverage
Jack-o’-Lantern Stuffed Peppers Prove Fun Isn’t Just for Pumpkins
These Jack-o’-Lantern Stuffed Peppers give you a Halloween-themed, kid-approved way to put vegetables on the dinner table.
Recipes:
Jack-o’-Lantern Stuffed Peppers
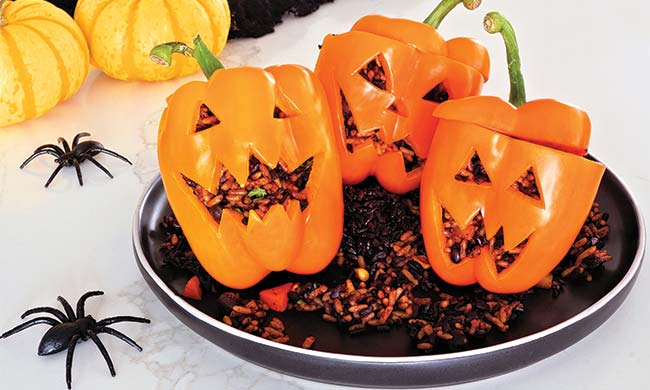
Jack-o’-Lantern Stuffed Peppers Prove Fun Isn’t Just for Pumpkins
(Feature Impact) Jack-o’-lantern carving is a cherished fall tradition – but pumpkins aren’t the only vegetables you can decorate with fun, spooky or scary faces. These Jack-o’-Lantern Stuffed Peppers give you a Halloween-themed, kid-approved way to put vegetables on the dinner table.
Filled with savory ground turkey, brown rice, melty cheese and warm, savory spices, these peppers taste as autumnal as they look. It’s simple to customize the filling to your family’s tastes, and you can even make the meal interactive by inviting kids to choose their own pepper colors and carve their own expressions.
Find more Halloween and seasonal recipes at Culinary.net.
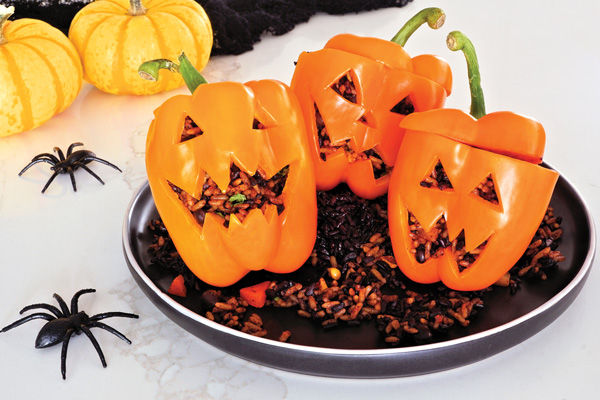
Jack-o’-Lantern Stuffed Peppers
Recipe adapted from AllRecipes
Prep time: 15 minutes
Cook time: 45 minutes
Servings: 4
- 1 teaspoon olive oil
- 1 pound ground turkey
- 3 cloves garlic, minced
- 1/2 medium onion, diced
- 1 teaspoon garlic powder
- 1 teaspoon cumin
- 4 large orange bell peppers
- 1 cup cooked brown rice
- 1 cup grated sharp cheddar cheese
- 2 teaspoons kosher salt
- 1/2 teaspoon ground black pepper
- cayenne pepper, to taste
- cups seasoned tomato sauce, warmed
- Preheat oven to 400 F and coat 9-by-13-inch baking dish with olive oil.
- In skillet, brown ground turkey with minced garlic, onion, garlic powder and cumin until meat is cooked, 4-5 minutes.
- With small knife, cut eyes, nose and mouth into flattest side of each pepper to resemble jack-o’-lantern. Cut around seed pods and remove pepper tops, trimming and discarding any seeds from under stems then setting tops aside. Trim white membranes from inside each pepper and shake out seeds. Place peppers in prepared baking dish.
- In bowl, combine turkey mixture with cooked rice, cheddar cheese, salt, black pepper and cayenne pepper, to taste.
- Divide and stuff mixture into peppers; cover with reserved pepper tops.
- Wrap baking dish loosely with aluminum foil and bake until peppers are tender, about 45 minutes.
- Spoon about 3 tablespoons warm tomato sauce onto each plate; place stuffed peppers on top. Serve remaining sauce on side.
Photo courtesy of Shutterstock

SOURCE:
Food and Beverage
Serve Up Smiles with Favorite Holiday Sides
Turkey and ham may sit centerstage, but classic holiday sides can make the season truly special. You can bring smiles to your loved ones’ faces by dishing out those favorite recipes everyone asks for year after year.
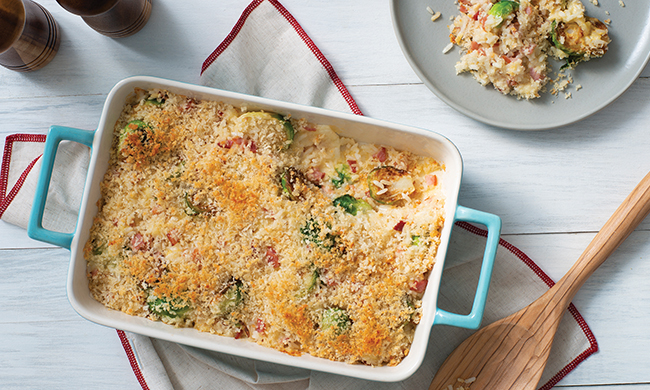
(Family Features) Turkey and ham may sit centerstage, but classic holiday sides can make the season truly special. You can bring smiles to your loved ones’ faces by dishing out those favorite recipes everyone asks for year after year.
Made with a delicious combination of rice, cheddar cheese, cream of mushroom soup and broccoli florets, this quick and easy version of Broccoli and Cheese Rice Casserole is an ideal one-pot dish to keep the holidays simple. With three easy steps and everyday ingredients, it comes together with minimal effort for traditional casserole taste.
When it comes to feeding a crowd, it’s often best to let your oven do the work. This Brussels Sprouts and Ham Rice Gratin recipe allows you to serve up a filling favorite with little effort using pantry staples. Plus, it’s a kid-friendly way to encourage veggies at this year’s holiday meal with gooey cheese providing tempting taste bud motivation.
These seasonal classics and more are made quick and easy with an option like Success Boil-in-Bag Rice, a pre-measured, mess-free way to make fluffy, high-quality rice. It’s cooked by simply dropping a bag of rice in a pot of water or broth then boiling it for 10 minutes. BPA-free and FDA-approved, the bags are safe to use and made to withstand high temperatures.
An added bonus: If you’re aiming to achieve a particular flavor, just season the rice by cooking in water infused with herbs, spices, broth, coconut milk or other liquids like juice for sweeter recipes.
Visit SuccessRice.com to find more holiday recipe inspiration.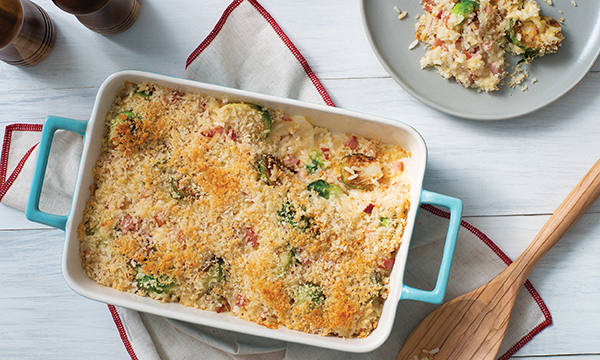
Brussels Sprouts and Ham Rice Gratin
Prep time: 20 minutes
Cook time: 25 minutes
Servings: 4
- 1 bag Success White Rice
- 1/2 pound Brussels sprouts, trimmed and halved
- 1/3 cup diced ham
- 1 clove garlic, minced
- 1 tablespoon olive oil
- 3/4 teaspoon salt, divided
- 3/4 teaspoon black pepper, divided
- 1 cup heavy cream
- 2 tablespoons finely chopped fresh chives
- 2 tablespoons Dijon mustard
- 1 cup shredded sharp cheddar cheese
- 1/2 cup grated Parmesan cheese, divided
- 1/3 cup breadcrumbs
- 2 tablespoons butter, melted
- Preheat oven to 450 F. Prepare rice according to package directions.
- In large bowl, toss Brussels sprouts, ham, garlic, olive oil, 1/4 teaspoon salt and 1/4 teaspoon pepper. Place on parchment paper-lined baking tray and roast 12-15 minutes, or until caramelized. Decrease oven temperature to 425 F.
- In large bowl, toss rice, Brussels sprouts mixture, cream, chives, Dijon mustard, remaining salt and remaining pepper. Stir in cheddar and 1/3 cup Parmesan cheese. Transfer mixture to greased, 2-quart baking dish.
- In small bowl, stir breadcrumbs, remaining Parmesan and melted butter. Sprinkle over rice mixture.
- Bake 12-15 minutes, or until golden brown and bubbling.
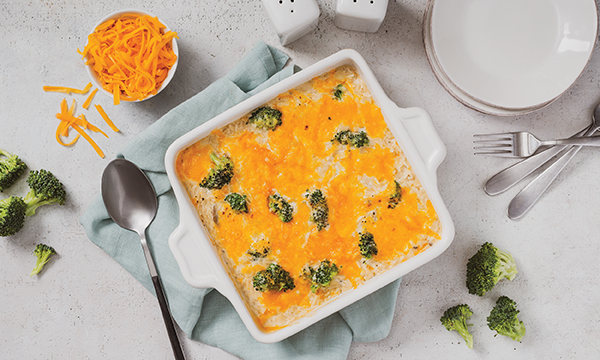
Broccoli and Cheese Rice Casserole
Prep time: 5 minutes
Cook time: 30 minutes
Servings: 4-6
- 1 bag Success White Rice or Brown Rice
- nonstick cooking spray
- 1 can (10 3/4 ounces) condensed cream of mushroom soup
- 2 cups frozen broccoli florets, thawed and drained
- 1 1/2 cups shredded cheddar cheese, divided
- 1/2 cup evaporated milk
- 3 tablespoons butter, melted
- 1 tablespoon grated onion
- 1/2 teaspoon salt
- 1/2 teaspoon black pepper
- Prepare rice according to package directions. Preheat oven to 350 F.
- Coat 2-quart casserole dish with nonstick cooking spray. In medium bowl, combine soup, broccoli, 1 cup cheddar cheese, evaporated milk, butter, onion, salt and pepper. Fold in rice.
- Pour mixture into prepared dish and top with remaining cheddar cheese. Bake 20 minutes.
SOURCE:
Success Rice
At our core, we at STM Daily News, strive to keep you informed and inspired with the freshest content on all things food and beverage. From mouthwatering recipes to intriguing articles, we’re here to satisfy your appetite for culinary knowledge.
Visit our Food & Drink section to get the latest on Foodie News and recipes, offering a delightful blend of culinary inspiration and gastronomic trends to elevate your dining experience.
https://stmdailynews.com/category/food-and-beverage
You can also find food and beverage-related videos on our YouTube channel, where we regularly post new content and share tips, recipes, and demonstrations. https://youtube.com/playlist?list=PLEhXBupt8tVynuUhpQZMxQt4lvPmOiAtQ&si=InDwc7YaB0KIwmxy
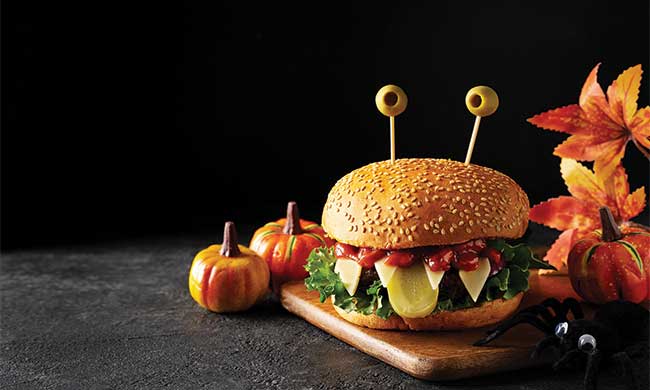
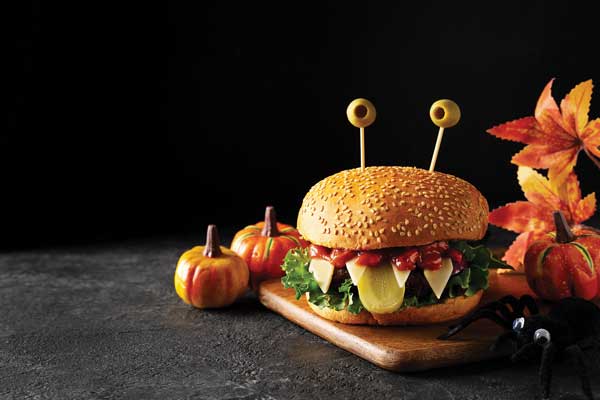
(Feature Impact) Out with the ordinary, in with the weird – that’s what the Halloween season is all about. These Halloween Monster Burgers give a ghoulishly fun twist on burger night, featuring all your favorite toppings transformed into olive eyes, cheese fangs and a pickle tongue.
Whether you reach for a traditional hamburger patty or switch it up with chicken, turkey, bean or veggie options, the effect is the same: a dinner that looks like it escaped from a mad scientist’s lab. It’s a good way to get some protein and veggies into kids before the trick-or-treating sugar rush, and you can even make it interactive by inviting them to decorate their own monsters and come up with creative variations.
Alternatively, if you’re looking for some spooky hors d’oeuvres to impress at this year’s Halloween party, these burgers are easy to size down into slider form. Serve a whole tray of mini monsters ready to devour – or be devoured by – hungry guests.
Find more Halloween recipe inspiration at Culinary.net.
Halloween Monster Burgers
Recipe adapted from Happy Foods Tube
Prep time: 10 minutes
Total time: 18 minutes
Servings: 4
- 4 hamburger, chicken or veggie patties
- 4 tablespoons mayonnaise
- 4 teaspoons ketchup, plus additional, to taste, divided
- 4 hamburger buns
- 8 leaves baby romaine lettuce
- 4 slices dill pickles, sliced lengthwise
- 4 cheese slices
- 8 large green olives, pits removed
- Cook burger patties until they reach desired doneness.
- In small bowl, combine mayonnaise and 4 teaspoons ketchup. Spread each bun base with about 1 tablespoon mayo sauce then add two lettuce leaves and cooked burger patty.
- Add pickle slice as monster “tongue.” Take each cheese slice and cut triangles into one side to resemble teeth; add to burger then cover with ketchup “blood,” to taste.
- Stick olives on toothpicks and add two to each top bun as “eyeballs.”
Photo courtesy of Shutterstock

SOURCE: