recipes
Creamy Vegan Grape Ice Cream
Last Updated on June 6, 2024 by Daily News Staff
(Family Features) Elevate summer desserts all season long with versatile, refreshing ingredients that can transform classics like ice cream into a new treat that’s bound to become a family favorite.
This Creamy Vegan Grape Ice Cream offers a dairy-free alternative to traditional summer sweets and is powered by Grapes from California. Simply puree grapes, combine with oat coffee creamer and let your freezer do the work. The result is a perfect balance of cold, fruity goodness in a silky-smooth bite.
Crisp, juicy and sweet, grapes also provide flavor and texture in a wide range of recipes. As an easy, portable and healthy snack, grapes can also be frozen for a simple, standalone dessert ideal for summer occasions.
Find more ways to cool off in the heat by visiting GrapesFromCalifornia.com.
Watch video to see how to make this recipe!
Creamy Vegan Grape Ice Cream
Prep time: 20 minutes
Cook time: 10-15 minutes, plus 6-8 hours freeze time
Servings: 8 (1/2 cup per serving)
- 1 pound stemmed black Grapes from California
- 12 ounces vanilla oat coffee creamer, well chilled
- 12 ounces unsweetened oat coffee creamer, well chilled
- In high-speed blender, puree grapes until smooth. Transfer to medium saucepan and bring to simmer. Reduce heat to low and cook 10-15 minutes, or until reduced to 1 cup. Cover and refrigerate until well chilled.
- Stir creamer into pureed grapes and pour into stainless steel mixer bowl. Using stand mixer, mix well. Cover and freeze 6-8 hours or overnight.
Substitution: For lighter color, use 3/4 pound black grapes and 1/4 pound red.
Note: Make sure stainless steel bowl is well chilled or frozen before making ice cream.
Nutritional information per serving: 140 calories; 0 g protein; 22 g carbohydrates; 6 g fat (39% calories from fat); 0 g saturated fat; 0 mg cholesterol; 45 mg sodium; 1 g fiber.
SOURCE:
California Table Grape Commission
https://stmdailynews.com/category/food-and-beverage
Author


recipes
Lighten Up: Fresh Spring Meals That Won’t Weigh You Down
Prepare your fresh spring menu with light, flavorful dishes like shrimp pearl couscous salad and chickpea couscous—perfect for easy, satisfying meals without the heaviness.

Lighten Up: Fresh Spring Meals That Won’t Weigh You Down
(Feature Impact) Put away the heavy coats and break out the rain jackets and rubber boots – spring is here, and with it comes more than just pop-up showers and sunshine. After months of comfort foods and curling up indoors, you may be ready for lighter meals that won’t weigh you down before splashing in the puddles.
Fresh produce may first come to mind, but spring bites can also mean swapping out ingredients like regular pasta for a solution such as pearl couscous. If you’re looking to complement greens, veggies, fish or meats with light yet filling flavor, consider Success Boil-in-Bag Pearl Couscous, a small, mediterranean-style pasta that always cooks right and is ready to eat in under 7 minutes once the water boils. The BPA-free boil-in-bag simplicity makes cooking easy and foolproof: no measure, no mess, no stress.
Made with high-quality semolina wheat, it features a slightly nutty flavor on its own while absorbing the flavors of salads while retaining its density and chewy texture. It’s distinguished from traditional Moroccan couscous by its slightly larger, rounder shape and less dense, firmer consistency.
Try it with your next meal in this protein-forward Shrimp Pearl Couscous Salad, made using fresh herbs, citrus, seasoned shrimp and chickpeas for a jam-packed salad that screams spring. Never boring, the tender, seasoned couscous and shrimp, veggies and aromatic herbs can bring your family running to the kitchen after a day of play.
Or, for an even simpler dish that requires just 15 minutes in the kitchen, this Pearl Couscous and Chickpea Salad is light, bright and bursting with flavor. It brings together tender pearl couscous, crisp veggies and za’atar in every bite.
To find more light spring recipe ideas, visit SuccessRice.com.
Shrimp Pearl Couscous Salad
Prep time: 10 minutes
Cook time: 15 minutes
Servings: 4
- 1 bag Success Pearl Couscous
- 1 pound large shrimp, peeled and deveined
- 1 tablespoon seasoned salt
- 4 tablespoons olive oil, divided
- 1 can (14 ounces) chickpeas, drained and rinsed
- 1/2 teaspoon garlic powder
- 1/2 teaspoon onion powder
- 1/2 teaspoon smoked paprika
- 1/4 teaspoon salt
- 1/2 English cucumber, diced
- 1 cup cherry tomatoes, halved
- 1/4 cup fresh basil, chopped
- 1/4 cup red onions, finely chopped
- 2 tablespoons fresh dill, chopped
- 1 tablespoon lemon juice
- 1/2 cup feta, crumbled
- Prepare pearl couscous according to package directions.
- In medium bowl, toss shrimp with seasoned salt.
- In large saucepan over medium-high heat, heat 1 tablespoon oil. Add shrimp and cook 5 minutes. If necessary, cook in batches to avoid overcrowding pan.
- In another large pan, heat 1 tablespoon oil over medium heat. Add chickpeas and cook 8 minutes until crispy and golden, tossing often. Add garlic powder, onion powder, paprika and salt. Toss to fully coat and cook 2 minutes.
- In large bowl, combine pearl couscous, shrimp, chickpeas, cucumbers, tomatoes, basil, red onion, dill, lemon juice and remaining olive oil. Toss to combine. Garnish with feta.

Pearl Couscous and Chickpea Salad
Prep time: 5 minutes
Cook time: 10 minutes
Servings: 4
- 1 bag Success Pearl Couscous
- 1 can (15 ounces) chickpeas, drained and rinsed
- 1 cup cherry tomatoes, halved
- 1/2 cup cucumber, diced
- 1/4 cup fresh parsley, chopped
- 1 tablespoon za’atar
- 2 tablespoons olive oil
- 1 tablespoon lemon juice, freshly squeezed
- 1/2 teaspoon salt
- 1/4 teaspoon pepper
- Prepare pearl couscous according to package directions.
- In large bowl, combine couscous, chickpeas, cherry tomatoes, cucumber, parsley and za’atar.
- Drizzle with olive oil and lemon juice. Season with salt and pepper. Toss until well combined.
- Serve warm or at room temperature.


SOURCE:
Hungry for what’s next? STM Daily News’ Food and Drink section dishes up the latest in restaurant news, beverage trends, seasonal recipes, culinary events, and food culture stories readers love to share.
Food and Beverage
Easy, Approachable Solutions for At-Home Lenten Meals
At-Home Lenten Meals: Lent is an opportunity for families to explore new seafood flavors, making mealtime enjoyable. Simple recipes, like One-Pot Creamy Shrimp Scampi, encourage kids to confidently try seafood, enhancing family meals.
Last Updated on April 1, 2026 by Daily News Staff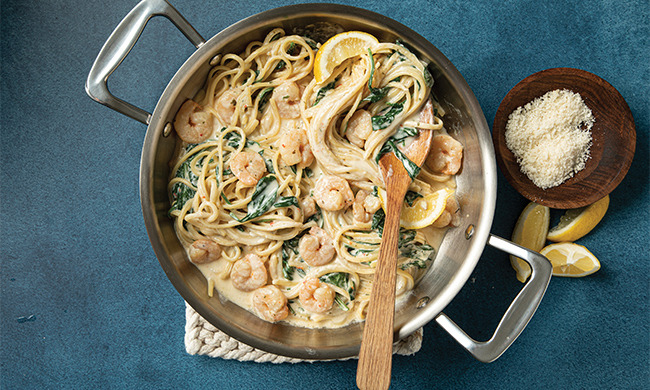
Easy, Approachable Solutions for At-Home Lenten Meals
(Feature Impact) Lent has long been a season of tradition and reflection, and it can also be an opportunity to introduce your family to exciting new flavors that may become staples in your kitchen.
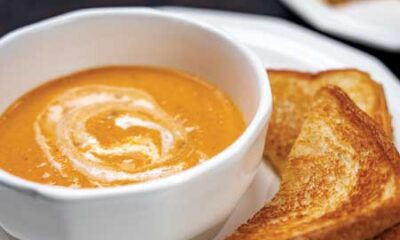
If preparing seafood feels intimidating, try starting with dishes that are easy, familiar and approachable. For example, One-Pot Creamy Shrimp Scampi features a velvety sauce, earthy spinach and buttery, delicious shrimp – a recognizable and approachable recipe that can be a gateway to discovery.
Made with SeaPak frozen shrimp, you can help picky eaters in your home feel more confident in saying “yes” to something new. Frozen seafood is a perfect partner for familiar favorites like pasta, making it a playful, stress-free solution for encouraging exploration at mealtime.
“For many families, Lent often brings a shift at the dinner table – and this year, parents are turning it into an opportunity to try something new,” said Diana Rice, child nutritionist and registered dietitian. “When food feels approachable, it lowers stress for everyone. Familiar flavors help kids say ‘yes’ more often, and those positive moments can make seafood a feel-good part of family meals during Lent and beyond.”
When kids see foods that look and taste familiar – like the crunch of crispy fried shrimp – they may feel more comfortable giving it a try. That’s why discovery can extend beyond the dinner table to snack time, too.
Give kiddos the energy they need for homework assignments with Butterfly Shimp Bruschetta, a quick solution for after-school or weekend snacking. As your pickier loved ones dive in for something new, those small wins can build confidence to try new things – one bite at a time.
This Lent, swap “giving up” for “try this” with more approachable frozen seafood solutions and family-friendly recipes at SeaPak.com.
//www.youtube.com/embed/006rXnSXZGY
One-Pot Creamy Shrimp Scampi
Prep time: 5 minutes
Cook time: 25 minutes
Servings: 4
- 1 package (12 ounces) SeaPak Shrimp Scampi
- 1 1/4 cups half-and-half or milk
- 1 1/4 cups chicken stock
- 8 ounces linguine noodles
- 6 cups fresh spinach
- 1/4 cup grated Parmesan cheese
- 4 lemon wedges
- In large, high-sided saute pan, add shrimp and cook according to package directions. Remove shrimp to bowl and keep warm.
- In same pan with scampi sauce, stir in half-and-half and stock. Bring to low boil. Add pasta. Cook, stirring occasionally, until pasta is cooked al dente, 8-10 minutes.
- Stir in spinach and cook just until beginning to wilt. Stir reserved shrimp into pan.
- To serve, divide shrimp scampi between four bowls and top each with grated Parmesan. Serve with lemon wedges.
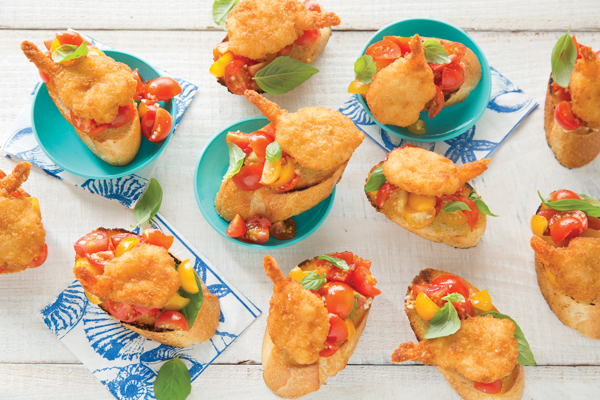
Butterfly Shrimp Bruschetta
Prep time: 15 minutes
Cook time: 15 minutes
Servings: 6
- 1 package (9 ounces) SeaPak Jumbo Butterfly Shrimp
- 1 baguette
- 3 garlic cloves, divided
- 6 tablespoons olive oil, divided
- 3 cups grape or cherry tomatoes, seeded and finely diced
- 1/3 cup chopped basil, plus additional for garnish
- salt, to taste
- pepper, to taste
- Preheat oven to 425 F. Bake shrimp according to package directions and keep warm.
- Slice baguette to match number of shrimp. Rub one garlic clove over one side of each slice of bread. Brush garlic-rubbed sides with 3 tablespoons olive oil. Set aside.
- Finely dice remaining garlic.
- In medium mixing bowl, stir tomatoes, remaining olive oil, diced garlic and 1/3 cup chopped basil. Season with salt and pepper, to taste, and set aside.
- In large, hot skillet, working in batches, add baguette slices oil sides down and cook until browned around edges. Remove from pan.
- Top each baguette slice with small spoonful of tomato mixture and one shrimp. Garnish with basil leaf.

SOURCE:
At our core, we at STM Daily News, strive to keep you informed and inspired with the freshest content on all things food and beverage. From mouthwatering recipes to intriguing articles, we’re here to satisfy your appetite for culinary knowledge.
Visit our Food & Drink section to get the latest on Foodie News and recipes, offering a delightful blend of culinary inspiration and gastronomic trends to elevate your dining experience. https://stmdailynews.com/food-and-drink/
Author
Food and Beverage
Create Little Moments of Happiness This Spring with Family-Friendly Potato Recipes
As spring encourages outdoor activities, The Little Potato Company offers time-saving products, like pre-washed Little Potatoes and crispy snacks. Enjoy convenient family meals and enter their sweepstakes for a chance to win travel and grocery prizes.

(Feature Impact) As the weather breaks and spring brings increased opportunities for families to get outside, activities, adventures and jam-packed calendars abound. All those special moments spent at the park, the sports field or in the backyard may leave lasting memories, but they can also leave you feeling short on time in the kitchen.
Bring a little moment of happiness to busy family mealtimes during the spring season with The Little Potato Company’s line of easy-to-prepare Little Potatoes. They come pre-washed, require no peeling and are small enough that they don’t need to be cut, allowing for less time in the kitchen and more family time around the table as the days get longer – no extra spring cleaning required. For an added helping of convenience, their Microwave Ready Little Potato Kits come with delicious seasoning packs; simply pop into the microwave, sprinkle on the included seasoning and enjoy.
For a fun after-school or game-night snack, these Crispy Air Fryer Potato Nuggets pair perfectly with a variety of delicious dips. The air fryer cooks the potatoes in minutes, creating a crispy snack with minimal prep – no chopping or peeling needed.
Or you can make a delicious side dish a cinch with pesto, which adds a bright, flavorful twist to a classic in these Basil Pesto Mashed Potatoes. They pair perfectly with everyday family meals using Little Potatoes that require no chopping or peeling thanks to their naturally thin skins, helping cut down on prep time while bringing fresh flavor to the dinner table.
To help fuel families’ spring vacation plans and everyday meals, The Little Potato Company is giving you a chance to enter a sweepstakes through May 25 to win a $10,000 travel voucher with additional prizes including 10 grocery gift cards valued at $1,000.
Enter the sweepstakes at TheLittleSpringtimeSweeptakes.com, and find more ways to make spring meals a breeze by visiting LittlePotatoes.com.
Crispy Air Fryer Potato Nuggets and Dip
Prep time: 10 minutes
Cook time: 24 minutes
Servings: 4
Potatoes:
- 1 cup all-purpose flour
- 1 teaspoon salt
- 1 teaspoon garlic powder
- 1/2 teaspoon pepper
- 1 cup milk
- 1 1/2 cups panko breadcrumbs
- 1 1/2 pounds Little Potatoes
Chimichurri:
- 1 bunch cilantro
- 1 bunch parsley
- 3 limes, juice only
- 2 tablespoons honey
- 2 teaspoons salt
- 1/2 teaspoon pepper
- 1 teaspoon chili flakes
- 1 cup canola oil
- Heat air fryer to 390 F.
- To make potatoes: In a shallow bowl, combine flour, salt, garlic powder and pepper. Whisk in milk until smooth.
- Place panko in a separate shallow bowl.
- Working in batches, coat potatoes in batter then toss in panko until fully coated.
- Place potatoes in the air fryer and cook 24 minutes, flipping halfway.
- To make chimichurri: In a blender, blend cilantro, parsley, lime juice, honey, salt, pepper, chili flakes and canola oil until smooth.
- Serve potato nuggets with chimichurri.

Basil Pesto Mashed Potatoes
Prep time: 5 minutes
Cook time: 20 minutes
Servings: 4
- 1 1/2 pounds Little Potatoes
- water
- 1 teaspoon salt, plus additional for seasoning, to taste, divided
- 2 1/2 cups fresh basil
- 4 cloves garlic
- 1/3 cup pine nuts
- 1/2 cup Parmesan, grated
- 2/3 cup olive oil
- pepper, to taste
- 1/2 cup milk
- 2 tablespoons butter
- Add potatoes to a large pot and cover with water. Add 1 teaspoon salt and bring to a boil for 15 minutes, or until potatoes are tender.
- In a food processor, place basil, garlic, pine nuts and Parmesan. Add oil and pulse until mixed then season with salt and pepper, to taste.
- In a small saucepot over low heat, heat milk and butter until butter is melted and milk is steaming.
- Once potatoes are cooked, strain and transfer to a medium mixing bowl.
- Using a potato masher, smash potatoes with milk and butter mixture then season with salt and pepper, to taste. Stir in pesto mixture.


SOURCE:
STM Daily News’ Food and Drink section highlights the stories, trends, flavors, and events shaping today’s food culture. From recipes to restaurant news, it keeps readers connected to what’s fresh and worth tasting.