recipes
An At-Home Solution with the Taste of Takeout
Taste of Takeout: If you’re cozying up at home but takeout cravings are calling, it may just be time for a pantry refresh that brings bold flavors straight to your kitchen. To ensure convenience and flavor is on your menu, consider these Spicy Tuna Sushi Rice Cups as an easy way to enjoy the taste of takeout from the comfort of your own kitchen.
Last Updated on May 16, 2026 by Daily News Staff
An At-Home Solution with the Taste of Takeout
(Feature Impact) If you’re cozying up at home but takeout cravings are calling, it may just be time for a pantry refresh that brings bold flavors straight to your kitchen. No matter what kind of cook you are – Bumble Bee Snackers are your new secret snack-section solution.
For unbeatable convenience and flavor, consider Bumble Bee Snackers for an at-home recipe enhancement. They’re shaking up the tuna aisle in single-serve cans with a variety of bold flavors that are perfect for snacking or light lunches, including zesty Lemon Pepper, rich and savory Hickory Smoke, tastebud-tingling Sweet Heat, spicy-sweet Thai Chili and nostalgic Tuna Salad. If you’re more of a traditionalist, classic Chunk Light Tuna is an ideal complement for crackers or veggies.
The premixed 3-ounce cans can be enjoyed on their own or paired with other favorites like celery sticks, carrots, cucumber, crackers or tortilla chips.
Snack menu shakeups are sweeping the country; in fact, 50% of Americans agree it’s hard to find snacks that meets all their needs, according to a survey conducted by Bumble Bee Seafoods and FleishmanHillard’s TRUE Global Intelligence. The survey also found hungry families are looking for more “bang for their buck,” affordability, protein and ease for eating on the go.
While value and convenience are important, great taste still tops the list – flavor remains the single biggest driver of snacking decisions. To ensure convenience and flavor is on your menu, consider these Spicy Tuna Sushi Rice Cups as an easy way to enjoy the taste of takeout from the comfort of your own kitchen.
Visit BumbleBee.com to discover more ways to shake up snacking at home.
Watch video to see how to make this recipe!

Spicy Tuna Sushi Rice Cups
Recipe courtesy of @amateur_husband on behalf of Bumble Bee Seafoods
Sushi Rice:
- 2 cups sushi rice, cooked
- 2 tablespoons rice vinegar
- 1 tablespoon sugar
- 1 teaspoon salt
Tuna Mixture:
- 1 can (5 ounces) Bumble Bee Snackers Lemon Pepper
- 3-4 tablespoons mayonnaise
- 1-2 teaspoons Sriracha, or to taste
- 1/2 teaspoon soy sauce
- 1/4 teaspoon wasabi (optional)
Assembly:
- nori (seaweed sheets)
- furikake seasoning
- spicy mayo or Sriracha, for topping
- wonton crisps, for topping
- Heat oven to 375 F.
- To make sushi rice: Mix cooked rice with rice vinegar, sugar and salt. Let cool slightly.
- To make tuna mixture: In bowl, combine tuna (no draining needed), mayonnaise, Sriracha, soy sauce and wasabi, if desired. Mix well.
- To assemble: Cut nori sheets into squares and press into cups of muffin tin to line them.
- Fill each nori-lined cup with sushi rice, pressing gently to form small nest shape.
- Sprinkle furikake over rice then top with spoonful of tuna mixture.
- Bake 8-10 minutes until heated through and edges are slightly crispy.
- Remove cups from muffin tin, drizzle with spicy mayo or Sriracha and top with wonton crisps.

SOURCE:
Bumble Bee Tuna
At our core, we at STM Daily News, strive to keep you informed and inspired with the freshest content on all things food and beverage. From mouthwatering recipes to intriguing articles, we’re here to satisfy your appetite for culinary knowledge.
Visit our Food & Drink section to get the latest on Foodie News and recipes, offering a delightful blend of culinary inspiration and gastronomic trends to elevate your dining experience. https://stmdailynews.com/food-and-drink/


(Family Features) From kickoff to the final whistle, taking your game day party to the next level starts with serving an all-star lineup of menu items. From starting-caliber appetizers to MVP-level main courses and a supporting cast of side dishes, dips like salsa and hummus can play the role of superstar when it comes to serving up game day grub.
One of the benefits of cheering on your favorite teams from the couch and bringing the tailgate to your literal home field is the availability of appliances you may not otherwise have access to at the stadium like the oven or air fryer. However, that doesn’t mean missing out on the action and being sidelined in the kitchen all game or that these recipes won’t travel to a tailgate.
With a flavor-packed, vibrant recipe, the lineup of Fresh Cravings Salsa offers a homemade-tasting alternative to softer, duller blends of jarred salsa. Made with high-quality ingredients like vine-ripened tomatoes, crisp vegetables, zesty peppers and spices, the salsas make a perfect addition to these recipes from celebrity chef and entertainer George Duran, author of “Take This Dish and Twist It” and host of Food Network’s “Ham on the Street” and TLC’s “Ultimate Cake Off.”
Kickoff your menu with an app like these Jalapeno Bacon and Salsa Biscuit Bites that meld together traditional tailgate tastes. Then put a Tex-Mex twist on a traditional favorite with this Enchilada Lasagna, perfect for feeding a crowd of hungry fans.
To round out the playbook, this Layered Mediterranean Hummus Salad can make for an accompaniment to a variety of main courses. The cucumbers, olives, cherry tomatoes and other veggies are balanced by the savory taste of Fresh Cravings Hummus. Made with a short list of high-quality ingredients like chickpeas, tahini and Chilean extra-virgin olive oil, it has a smooth, creamy mouthfeel.
Find more game-winning recipes made for homegating and tailgating at FreshCravings.com.
Layered Mediterranean Hummus Salad
Recipe courtesy of chef George Duran
Servings: 4-6
- 2 containers (10 ounces each) Fresh Cravings Hummus, any flavor
- 1 cup sliced cucumbers
- 1/2 cup Kalamata olives, seeded and roughly chopped
- 1/2 cup canned garbanzo beans, drained
- 1/4 cup crumbled feta cheese
- 3/4 cup cherry tomatoes, quartered
- 1/4 red onion, finely chopped
- 2 tablespoons finely chopped fresh parsley
- 1/2 lemon, juice only
- extra-virgin olive oil
- zaatar, for sprinkling (optional)
- pita bread or tortilla chips
- On bottom of large, flat serving dish or platter, use spoon to evenly spread hummus.
- Layer cucumbers, olives, garbanzo beans, feta cheese, cherry tomatoes, red onion and parsley throughout hummus. Squeeze lemon juice over top.
- Drizzle with olive oil and sprinkle with Zaatar, if desired. Serve immediately with pita bread or tortilla chips.
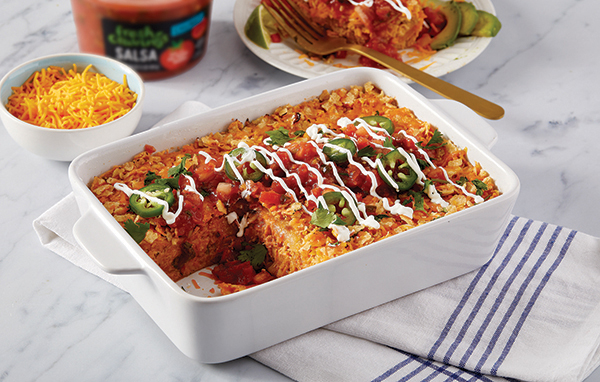
Enchilada Lasagna
Recipe courtesy of chef George Duran
Servings: 4-6
- 2 tablespoons olive oil
- 1 large onion, chopped (1 cup)
- 1 deli roasted chicken, skin and bones removed, shredded
- 2 tablespoons taco seasoning
- 1 cup chicken stock or broth
- 8 ounces cream cheese, at room temperature
- 2 cups shredded Tex-Mex cheese blend
- 16 ounces Fresh Cravings Chunky Salsa, plus additional for serving
- 1 cup fresh cilantro, chopped
- nonstick cooking spray
- 6 flour tortillas (9 inches each)
- 1 cup tortilla chips, crushed
- 1 cup shredded cheddar cheese
- Preheat oven to 350 F.
- In large skillet over medium-high heat, add olive oil. Add onions and cook until soft and translucent, 4-5 minutes.
- Add shredded chicken and stir in taco seasoning. Add chicken broth and bring to simmer, about 5 minutes.
- Add cream cheese, Tex-Mex cheese, salsa and cilantro. Stir until cream cheese is melted and simmer 3-4 minutes until slightly thickened.
- Spray square baking dish with nonstick cooking spray. Place two tortillas in bottom of pan, folding over or trimming sides of tortillas to fit.
- Spoon half chicken mixture over tortillas. Repeat then place remaining tortillas over top. Mix crushed tortilla chips with cheddar cheese and sprinkle over top. Bake 30 minutes, or until lasagna is bubbling and lightly browned.
- Let stand 10 minutes then top with additional salsa before serving.
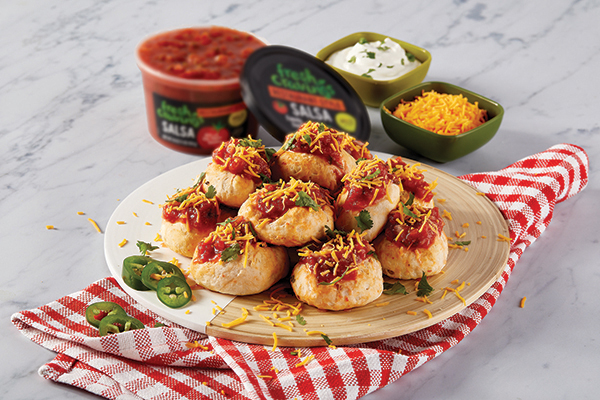
Jalapeno Bacon and Salsa Biscuit Bites
Recipe courtesy of chef George Duran
Yield: 16 biscuit bites
- 1 tube biscuit dough (8 biscuits total)
- 7 ounces grated mozzarella cheese
- 1/4 cup jarred jalapenos, chopped
- 8 slices cooked bacon, chopped
- 1 cup Fresh Cravings Restaurant Style Salsa
- nonstick cooking spray
- Preheat air fryer to 350-360 F.
- Divide each biscuit in half by pulling apart in centers. Use hands to flatten each biscuit into circles. Set aside.
- In bowl, mix mozzarella cheese with chopped jalapenos, bacon and salsa.
- Add heaping spoonful into each flattened biscuit and pinch each together tightly to form balls. Top each with small amount of salsa mixture.
- Spray nonstick cooking spray in air fryer and, working in batches, cook biscuit bites 6-9 minutes until golden brown.
- Serve warm.
- Note: If air fryer access is unavailable, biscuit bites can be baked 8-10 minutes at 400 F in oven, or until golden brown.
SOURCE:
Fresh Cravings
https://stmdailynews.com/category/food-and-beverage

(Family Features) If you’re in a tight spot for a last-minute potluck barbecue, don’t just throw together any salad. This Queso Cheese Corn Salad features a zesty homemade dressing and a salad base with a bit of heat (if you dare). Discover more cookout recipes by visiting Culinary.net.

Queso Cheese Corn Salad
Recipe courtesy of “Cookin’ Savvy”
Servings: 4-6
Dressing:
- 2 limes, juice only
- 1/4 cup mayo
- 1 pinch salt
- 1 tablespoon sugar
- 2 cans whole corn, drained
- 1 cup chopped bell pepper
- 1/4 cup chopped red onion (optional)
- 1 hot pepper (optional)
- 1 cup shredded queso cheese
- freshly chopped cilantro, for garnish
- To make dressing: In bowl, mix lime juice, mayo, salt and sugar.
- In separate large bowl, mix corn; bell pepper; onion, if desired; hot pepper, if desired; and queso cheese.
- Pour dressing over corn mixture and mix well. Top with cilantro.
SOURCE:
Culinary.net
 What’s your favorite food, recipe, or dining spot? Tell us in the comments! Then subscribe to the STM Daily News Food and Drink newsletter for fresh recipes, restaurant news, food trends, and delicious stories delivered straight to your inbox. Join our growing community of food lovers today!
(Family Features) A menu of filling, delicious recipes is just what your family needs to make each school day a successful educational adventure. Satisfying lunch and dinner ideas can give loved ones the fuel they need while delicious desserts provide motivation for growing minds to get homework finished before enjoying a treat.
When weeks get hectic due to busy schedules, these recipes offer simple solutions to make cooking easier while limiting time spent in the kitchen. Start with a lunch that’s as easy to make as it is to pack in a lunchbox, recharge in the evening thanks to a veggie-forward main course and satisfy everyone’s sweet tooth with a chocolatey favorite to round out the day.
Keep your family full and energized each school day with more recipe ideas at Culinary.net.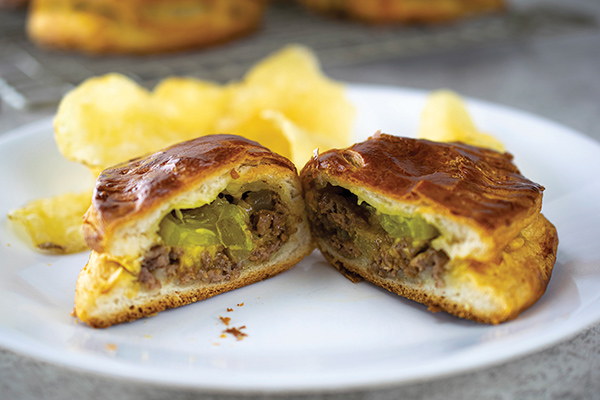
Make School Lunches a Breeze
There’s a lot to remember when sending your student off to school each morning, from backpacks and school supplies to last night’s homework. Don’t forget one of the key ingredients to a successful day: lunch.
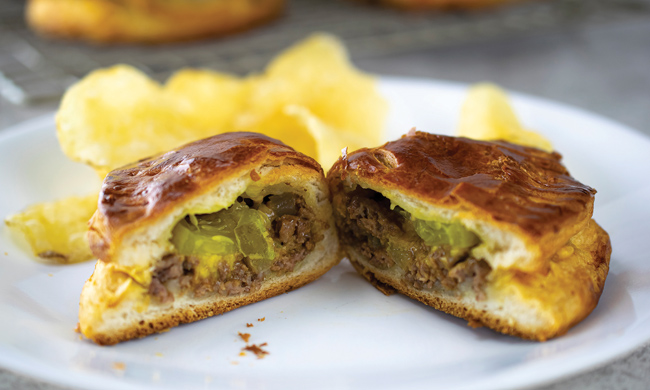
These Cheeseburger Turnovers provide the energy little learners need to power through their afternoon lessons. One winning idea to make the week easier is to prep a full batch of these easily packable, kid-friendly handhelds Sunday night so you’ve got lunch ready for each day.
To find more school day recipe inspiration, visit Culinary.net.
Cheeseburger Turnovers
- 1 pound ground beef
- 1/2 cup onion, chopped
- 2 tablespoons ketchup
- 1 tablespoon mustard
- 1 can flaky biscuits
- 1 cup shredded cheese
- dill pickle slices, halved
- 1 egg, beaten
- Heat oven to 375 F.
- In large skillet, cook ground beef and onion until beef is thoroughly cooked and onions are tender. Drain. Stir in ketchup and mustard.
- Separate biscuit dough. On ungreased baking sheet, flatten biscuit dough to form 6-inch rounds. Spoon beef mixture onto one side of flattened dough. Sprinkle with cheese. Top with dill pickle half. Fold dough over filling. With fork tines, press dough edges to seal. Cut two slits in top of dough to release steam. Repeat with remaining dough, beef mixture, cheese and pickles.
- Brush each turnover with egg wash.
- Bake 18-22 minutes, or until deep golden brown.

A Perfect Pasta for School Nights
Weeknight meals are all about putting tasty dishes on the table in a short amount of time so you can share precious moments together despite busy schedules.
In a matter of minutes, you can prepare this Lentil Bolognese with Veggie-Based Penne for a quick yet flavorful recipe that can be enjoyed by little ones and adults alike. Featuring Veggiecraft Farms Cauliflower Penne as its key ingredient, this family meal makes it easy to incorporate vegetables without sacrificing taste. Available in popular shapes like penne, spaghetti and elbow, and made with lentils, peas and cauliflower, zucchini or sweet potato, the veggie-based pastas are gluten-free, non-GMO, vegan, Kosher and good sources of protein and fiber.
Visit veggiecraftfarms.com for more information and family-friendly recipes.
Lentil Bolognese with Veggie-Based Penne
- 1 cup dry French green lentils or brown lentils
- 1 jar (24 ounces) marinara sauce
- 1/2 cup vegetable broth
- 1 box Veggiecraft Farms Cauliflower Penne
Toppings:
- fresh basil
- Parmesan cheese
- red pepper flakes
- Cook lentils according to package directions. Drain then return to pot and add marinara and vegetable broth. Stir well and simmer over low heat about 10 minutes.
- Cook penne according to package directions.
- Top cooked pasta with lentil Bolognese, fresh basil, Parmesan cheese and red pepper flakes.
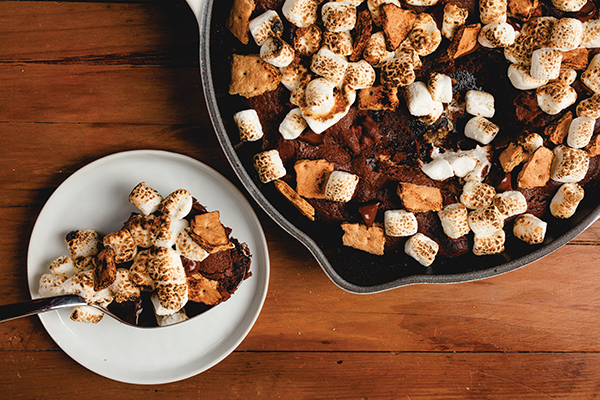
A Heaping Serving of Homework Motivation
Heading back to school doesn’t have to mean forgetting the fun of warm weather treats. Once the homework is done and you’ve enjoyed dinner with loved ones, turn your attention to a dessert that tastes like it was prepared by a professional baker.
This S’mores Skillet starts with a sweet brownie base made with Domino Light Brown Sugar and is then infused and topped with traditional s’mores ingredients. Just combine in a skillet then bake – or grill for that familiar outdoor feel – until warm and gooey.
Find more dessert ideas to sweeten up back-to-school season at DominoSugar.com.
S’mores Skillet
Prep time: 30 minutes
Cook time: 10 minutes
Servings: 6
- 8 tablespoons unsalted butter
- 3/4 cup semisweet chocolate chips, divided
- 2 ounces unsweetened chocolate
- 1/4 cup all-purpose flour
- 1 teaspoon baking powder
- 1/4 teaspoon salt
- 2 large eggs
- 1/2 cup Domino Light Brown Sugar
- 1 teaspoon pure vanilla extract
- 1 cup mini marshmallows, divided
- 6 graham crackers, roughly crumbled, divided
- Preheat oven or grill to 350 F.
- Place medium heat-proof bowl over medium saucepan simmering with water. Add butter, 1/4 cup chocolate chips and unsweetened chocolate; melt. Remove from heat and allow mixture to cool 15 minutes.
- In small bowl, whisk flour, baking powder and salt.
- In large bowl, mix eggs, sugar and vanilla. Add chocolate mixture and mix until well combined. Stir in flour mixture. Add 1/4 cup chocolate chips, 1/2 cup mini marshmallows and three graham crackers to batter.
- Pour mixture into 8-inch skillet. Top with remaining mini marshmallows, chocolate chips and graham crackers. Grill or bake 10-12 minutes. Remove from grill. Cool 10 minutes and serve.
SOURCE:
Veggiecraft Farms
Domino Golden Sugar
https://stmdailynews.com/category/food-and-beverage