recipes
Choose Fresh Cherries for Healthy and Sweet Back-to-School Snacking
(Family Features) This year provided a long sweet cherry season, which means fresh sweet cherries will be available in produce aisles during the back-to-school season. Cherries, which are a superfruit packed with nutrients and antioxidants, are perfect for lunchboxes, after-school snacking and grab-and-go munching in the car on the way to and from activities.
Sweet cherries’ high antioxidant content, beneficial effects on inflammation and natural ability to improve sleep quality make them a must-add to your grocery list. Even picky eaters can enjoy this nutritious snack. It’s a sweet treat that won’t spike sugar levels, providing steady nutrition as cherries boast a lower glycemic index than almost any other fruit.
 Sweet cherries are also loaded with vitamin C to help boost immune systems and keep skin glowing. Studies have found sweet cherries are packed with serotonin, which is an important neurotransmitter that plays a role in managing stress and stabilizing mood. Cherries are also a great source of fiber, adding to their benefits during the back-to-school season.
Cherries are not only a healthy snack; they are also convenient. For younger kids, cherries can be easily pitted for easy and safe snacking. If you don’t have a cherry pitter, cherries can be pitted with a knife or kids can try removing the stem and gently pushing a straw or chopstick through the middle of the cherry until the pit pops out. For older kids, cherries only need to be rinsed before adding them to a lunchbox. Cherries also easily keep for hours without being refrigerated.
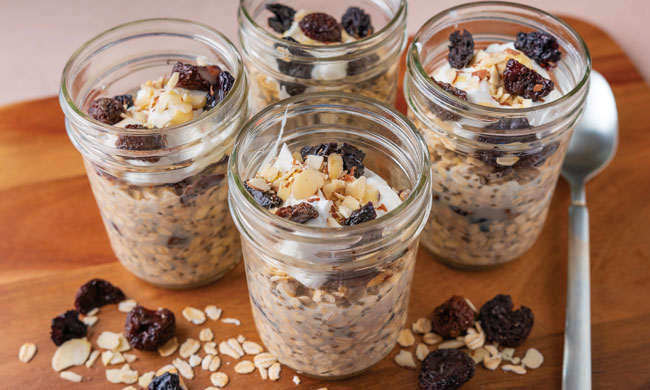
In addition to school lunches and snacking, cherries can also be added to many breakfast foods like pancakes, granola, yogurt, smoothies or these Cherry Overnight Oats. Give your family a jumpstart on the day with a healthy cherry breakfast featuring sweet cherries to deliver nutritional benefits, a natural sweetness and bright color that is sure to delight.
The benefits of this wholesome fruit can be accessed any time by drying, canning and freezing cherries at their peak ripeness to preserve their goodness for year-round enjoyment.
More recipes, from breakfasts and entrees to desserts and drinks, can be found at nwcherries.com/recipe.

Cherry Overnight Oats
Recipe courtesy of Northwest Cherry Growers
- 2 cups rolled oats
- 4 tablespoons chia seeds
- 1 1/2 cups milk
- 2 teaspoons pure almond extract
- 4 tablespoons pure maple syrup
- 1/2 cup Northwest Cherries, roughly chopped, plus additional for serving (optional)
- Greek yogurt (optional)
- sliced almonds (optional)
- In mixing bowl, stir oats and chia seeds to combine.
- Add milk, almond extract and maple syrup. Stir to combine until uniformly mixed.
- Using 1/4 cup measuring cup, divide oats mixture among four small jars, adding layer of cherries between scoops. Top with remaining cherries.
- Seal jars and transfer to refrigerator overnight, or at least 6 hours, before serving.
- Serve on their own or top with Greek yogurt, additional dried cherries and sliced almonds, if desired.
Photo courtesy of Shutterstock (girl with cherries)
SOURCE:

Food and Beverage
Support Your Brain with a Peanut-Powered Snack
Peanut-Powered Snack: Young or old, all can benefit from giving the brain a healthy boost. Emerging nutritional science makes it clear that good cognitive function goes beyond mental exercises as food can help shape memory, mood and cognitive health.

Support Your Brain with a Peanut-Powered Snack
(Feature Impact) Young or old, all can benefit from giving the brain a healthy boost. Emerging nutritional science makes it clear that good cognitive function goes beyond mental exercises as food can help shape memory, mood and cognitive health.
A study published the “Journal of the Prevention of Alzheimer’s Disease” found adults 60-80 years old who did not eat peanuts and peanut butter regularly were 30-50% more likely to perform poorly on tests measuring learning, memory, language, processing motor speed and attentiveness compared to those who did consumer peanuts and peanut butter. Additionally, research published in “Clinical Nutrition” highlighted a study of college students ages 18-33 which showed consumption of peanuts and peanut butter was associated with improved memory function and decreased anxiety, depression and stress.
Peanut butter is the key ingredient in these Protein Balls, a snack time favorite with a pinch of protein that serves as a perfect pick-me-up after a day in the office or following your favorite workout routine.
Despite their small stature, peanuts pack a nutrition punch. Their unique blend of various vitamins, minerals and bioactive compounds includes:
- Niacin, which can slow cognitive decline and reduce the risk for Alzheimer’s disease, according to the “Journal of Neurology, Neurosurgery and Psychiatry”
- Vitamin E, found to promote healthy brain aging and delay cognitive decline
- Resveratrol, believed to be beneficial in fighting against Alzheimer’s disease and other nerve degenerating diseases, per the “Journal of Biological Chemistry”
- P-coumaric acid, an antioxidant that appears to target the neurotransmitters in the brain that regulate mood, stress and anxiety
To find more ways to support your brain with the right nutrition, visit GAPeanuts.com.
Watch video to see how to make this recipe!
Protein Balls
Recipe courtesy of The Peanut Institute
Servings: 24
- 1 cup chunky peanut butter
- 1 tablespoon vanilla
- 1/4 cup honey
- 2 cups quick oats
- 2 tablespoons ground flaxseed
- 1/2 cup shredded coconut
- 1/2 cup dried, chopped cranberries
- 1/8 teaspoon iodized salt
- 1/4 cup water
- Using stand mixer, combine peanut butter, vanilla, honey, quick oats, flaxseed, coconut, cranberries, salt and water; mix until well combined.
- Form dough into 1-ounce portions and refrigerate 30 minutes before serving.
Nutritional information per serving: 130 calories, 7 g fat, 14 g carbohydrates, 3 g protein, 2 g fiber, 60 mg sodium.
SOURCE:
🍴 What’s your favorite food, recipe, or dining spot? Tell us in the comments! Then subscribe to the STM Daily News newsletter for fresh recipes, restaurant news, food trends, and delicious stories delivered straight to your inbox. Join our growing community of food lovers today!
Food and Beverage
Easy, Restaurant-Worthy Meals for Busy Days
Restaurant-Worthy Meals: When life gets busy, your home should be a place of reprieve, not extra stress – and that includes your kitchen. In seasons like this, rather than waiting for a table at your favorite restaurant or standing in line for takeout, turn to quick, easy recipes like this Garlic Parmesan Rice and Shrimp Skillet or Egg Roll in a Bowl.
(Feature Impact) When life gets busy, your home should be a place of reprieve, not extra stress – and that includes your kitchen. If you’re juggling work, chores, errands, hobbies, studies, a social life, caretaking or the other million-and-one things keeping your schedule full right now, the idea of spending an hour putting together a home-cooked meal might sound exhausting or downright impossible.
In seasons like this, rather than waiting for a table at your favorite restaurant or standing in line for takeout, turn to quick, easy recipes that offer nutritional balance and don’t skimp on flavor. By using pre-seasoned Minute Rice Cups – like the new, crave-worthy Garlic Parmesan to satisfy comfort cravings and Veggie Stir-Fry that lets you enjoy the flavor of takeout without the wait – you can have a flavorful base for your meals ready in 1 minute. You won’t even have to pull out the rice cooker or go scrounging in the spice cabinet.
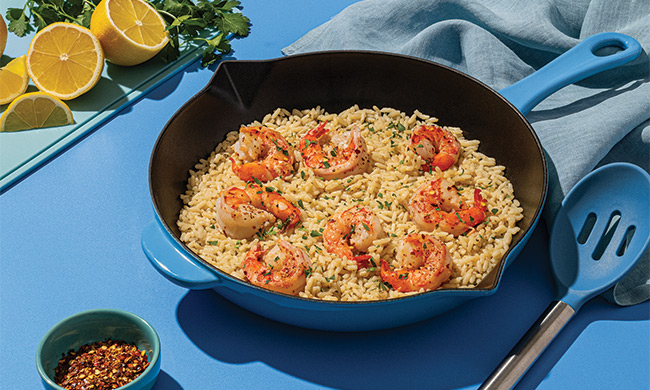
If you’re craving a savory, cheesy dinner, this high-protein Garlic Parmesan Rice and Shrimp Skillet, ready in only 6 minutes, is an ideal choice for busy home chefs searching for that elusive balance between simple and sophisticated. Plus, the recipe can easily be adapted to your household’s tastes; try tossing some spinach or chickpeas into the skillet or swapping the shrimp for chicken or tofu.
To enjoy takeout flavors without the trip, opt for this restaurant-inspired Egg Roll in a Bowl recipe. Savor the umami notes of soy sauce and enjoy the convenience of tender onions, carrots and peas mixed into the stir-fry rice cup that forms the base of your meal. The toppings are what give this recipe its deconstructed egg roll vibe: flavorful sauteed cabbage joins crunchy wonton strips and a protein of choice for a bowl that comes together in just 20 minutes.
For more meal ideas to keep you going when life is moving quickly, visit MinuteRice.com.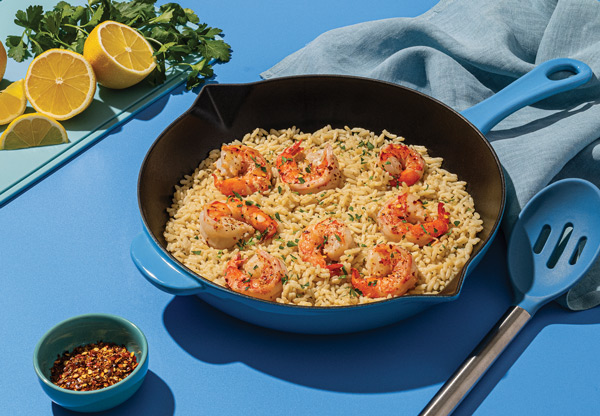
Garlic Parmesan Rice and Shrimp Skillet
Prep time: 1 minute
Cook time: 5 minutes
Servings: 1-2
- 1 Minute Garlic Parmesan Rice Cup
- 1 tablespoon olive oil
- 8 ounces large shrimp, peeled and deveined
- 1 tablespoon lemon juice
- 1/4 teaspoon red pepper flakes
- 1 tablespoon fresh parsley, chopped
- lemon wedges, for garnish (optional)
- Heat rice according to package directions.
- In medium skillet, heat olive oil over medium heat. Add shrimp to skillet and cook until pink, about 3 minutes. Remove shrimp from skillet and set aside.
- In same skillet, add rice, lemon juice and red pepper flakes. Stir to combine and heat through, 1 minute. Return shrimp and stir to combine.
- Garnish with parsley. Squeeze lemon wedge over top, if desired, and serve.
Substitution: Use sauteed mushrooms or crispy tofu to make vegetarian.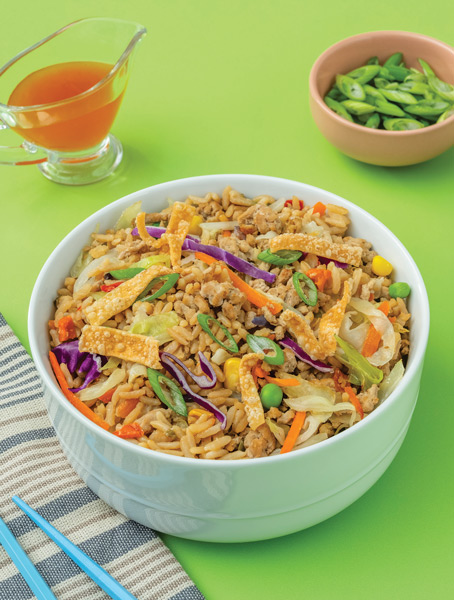
Egg Roll in a Bowl
Prep time: 2 minutes
Cook time: 18 minutes
Servings: 2
- 1 Minute Veggie Stir-Fry Rice Cup
- 1/2 pound ground turkey or pork
- 1 cup coleslaw mix
- 1 garlic clove, minced
- 2 tablespoons soy sauce
- 1 teaspoon ginger, freshly grated
- 1/2 teaspoon sesame oil
- 1/2 cup fried wonton strips
- 2 tablespoons sweet and sour sauce
- Heat rice according to package directions.
- In large pan, cook meat over medium heat 10 minutes, or until browned and cooked through. Drain any excess grease.
- Add coleslaw, garlic, soy sauce, ginger and sesame oil to pan. Cook 8 minutes, or until coleslaw is softened. Add rice during final 4 minutes.
- Top with wonton strips, drizzle sweet and sour sauce and serve.
Tip: To add more vegetables, try mushrooms, bell peppers, snap peas or green onions. For extra spice, drizzle on sriracha or hot sauce of choice.

SOURCE:
🍴 What’s your favorite food, recipe, or dining spot? Tell us in the comments! Then subscribe to the STM Daily News Food and Drink newsletter for fresh recipes, restaurant news, food trends, and delicious stories delivered straight to your inbox. Join our growing community of food lovers today!

(Feature Impact) If you’re planning on firing up the grill for an upcoming summer gathering, you might be trying to brainstorm options beyond the traditional burgers and dogs. Luckily, there are recipes that let you keep things interesting without becoming too complicated.
These Super Moist Boneless Pork Chops might just make you the favorite grill master in the neighborhood. Salt, sugar and aromatic ingredients like juniper berries and bay leaves give the meat a rich, complex flavor, and the combination of brining and grilling helps you achieve a tender but juicy finished product.
Since the recipe features Coleman Boneless Pork Chops, which deliver exceptional flavor from pork raised with no antibiotics ever and no added hormones, it’s easy to elevate your cookout with high-quality protein that you can feel good about serving to family and friends. Make it an extra memorable occasion with family-favorite sides like grilled asparagus, a light summer salad, diced potatoes and dinner rolls then round out your flavor-infused evening with an all-American tradition such as apple pie.
If your grilling plans get rain-checked, you can easily sear the pork chops in a skillet or bake them in the oven to take the party indoors.
Find more summer recipe ideas by visiting ColemanNatural.com.
Super Moist Boneless Pork Chops
Prep time: 7 hours
Cook time: 40 minutes
Servings: 4
- 1 quart water
- 1/2 cup brown sugar
- 1/2 cup kosher salt
- 1 bay leaf
- 12 juniper berries
- 6 cups ice
- 4 Coleman Boneless or Bone-In Pork Chops (1 1/2 inches thick)
- 1 teaspoon black pepper, freshly ground
- 1 teaspoon sea salt
- 2 scallions, thinly sliced, for garnish
- In large pot, heat water, brown sugar, kosher salt, bay leaf and juniper berries over high heat until sugar and salt are dissolved.
- Remove from stove and add ice. Liquid should be cool to touch.
- Add pork chops to liquid, cover and refrigerate 4-6 hours, or overnight.
- Approximately 10-15 minutes before grilling, heat grill to medium heat, remove chops from brine and pat dry with paper towels. Season with freshly ground black pepper and sea salt.
- Grill until desired doneness, or until internal temperature reaches at least 145 F for medium finish. Garnish with scallions. Serve with side dishes of choice

SOURCE:
🍴 What’s your favorite food, recipe, or dining spot? Tell us in the comments! Then subscribe to the STM Daily News newsletter for fresh recipes, restaurant news, food trends, and delicious stories delivered straight to your inbox. Join our growing community of food lovers today!