Food and Beverage
Entertain Guests with a Fresh Al Fresco Favorite
Last Updated on July 21, 2024 by Daily News Staff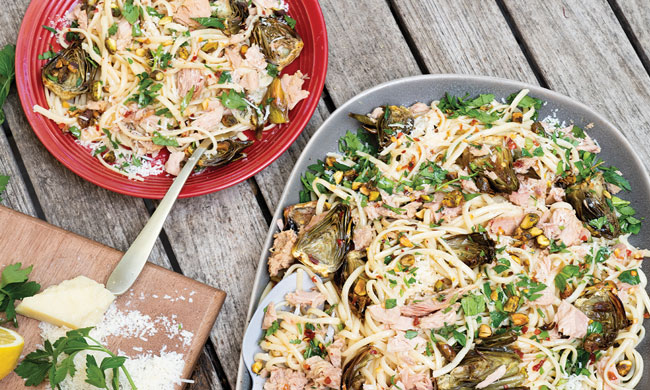
(Family Features) If you and your loved ones yearn for new, stimulating experiences to feel connected to the outdoors, look no further than enjoying mealtime al fresco. Inspired by the Mediterranean tradition of “eating in the open air,” al fresco dining offers passionate home cooks a fresh way to enjoy their favorite recipes outside with friends and family.
Consider these two tried-and-true al fresco tips from television personality and culinary icon Rachael Ray the next time you enjoy dinner on the deck or lunch on the patio.
Gather the right tools: On those buggy days and nights during the warm season when you’re dining al fresco, grab a food mesh tent. Not only will it protect your food, but it also looks good and goes with a variety of table settings.
Plan the decor: When hosting friends and family, up your floral game by reaching into the garden and adding some fresh herbs – it’s aesthetically pleasing and smells delicious.
Ideal al fresco meals typically take advantage of in-season produce, offer easy preparation so you can focus on entertaining and are simple enough to eat outdoors. Skip complicated cooking steps and turn to a delicious option like Yellowfin Tuna and Artichoke Pasta, which can be served as an appetizer, side dish or on its own as a light main course.
This dish practically calls for ingredients like Genova Yellowfin Tuna in Olive Oil, which features cuts of wild-caught tuna, hand-filleted in just the right amount of olive oil. Savory, rich and flavorful with a perfect texture, the tuna elevates the dish with a uniquely rich and savory flavor stemming from Mediterranean inspiration.
To find more al fresco dining inspiration and recipe ideas, visit GenovaSeafood.com.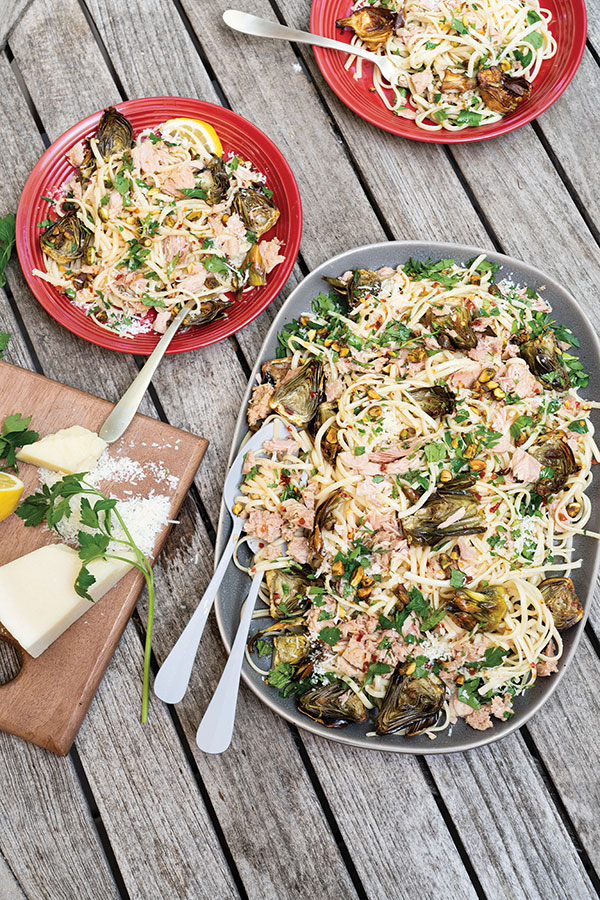
Yellowfin Tuna and Artichoke Pasta
Recipe courtesy of Rachael Ray on behalf of Genova Tuna
Prep time: 15 minutes
Cook time: 40 minutes with fresh artichokes (25 minutes with canned)
Servings: 4
Artichokes:
- Cold water
- 12 small, fresh artichokes or 2 cans artichoke hearts in water
- 2 lemons
- 3 tablespoons extra-virgin olive oil
- salt, to taste
- pepper or red pepper, to taste
Pasta:
- Water
- 2 cans (5 ounces each) Genova Yellowfin Tuna in Olive Oil
- 2 tablespoons extra-virgin olive oil
- 4 tablespoons butter, cut into tabs
- 4 cloves garlic, chopped
- 1 teaspoon crushed red pepper (optional)
- salt, to taste
- 1/2 cup white wine, chicken stock or vegetable stock
- 1 pound spaghetti or linguine
- 1 lemon, juice only
- 1 cup grated Pecorino Romano cheese
- 1/4 cup chopped fresh Italian parsley, divided
- 1 small handful fresh mint, chopped, divided
- 1/4 cup toasted pistachios or pine nuts, chopped
- To make artichokes: Preheat oven to 425 F.
- Fill bowl with cold water and juice of one lemon.
- If using fresh artichokes, trim tops of artichokes and tougher outer leaves. Using vegetable peeler or small paring knife, trim stems. Once prepped, cut fresh artichokes in half. If using canned artichokes, drain well and quarter lengthwise.
- Place artichokes in lemon water.
- Let soak 2-3 minutes, drain and pat dry with kitchen towel.
- In casserole or baking dish, arrange artichokes and add juice of remaining lemon, quarter lemon and add lemon wedges to dish.
- Add olive oil and salt and pepper, to taste.
- Roast 25-30 minutes, or until tender.
- To make pasta: Bring large pot of water to boil.
- While water is coming to boil, place large skillet over medium heat and add olive oil and butter. Add garlic; red pepper, if desired; and salt, to taste, and swirl 1 minute. Add white wine or stock and let reduce by half.
- When water comes to boil, salt water, add pasta and cook 1 minute less than directions. Reserve 1/2 cup pasta water before draining.
- Add artichokes to large skillet with tuna with its oil and gently break up with back of wooden spoon or paddle.
- Add lemon juice and reserved pasta water to skillet along with drained pasta, cheese and half the parsley, mint and pistachios. Toss to combine, top with remaining parsley, mint and pistachios and serve.
SOURCE:
Genova Tuna


(Family Features) From kickoff to the final whistle, taking your game day party to the next level starts with serving an all-star lineup of menu items. From starting-caliber appetizers to MVP-level main courses and a supporting cast of side dishes, dips like salsa and hummus can play the role of superstar when it comes to serving up game day grub.
One of the benefits of cheering on your favorite teams from the couch and bringing the tailgate to your literal home field is the availability of appliances you may not otherwise have access to at the stadium like the oven or air fryer. However, that doesn’t mean missing out on the action and being sidelined in the kitchen all game or that these recipes won’t travel to a tailgate.
With a flavor-packed, vibrant recipe, the lineup of Fresh Cravings Salsa offers a homemade-tasting alternative to softer, duller blends of jarred salsa. Made with high-quality ingredients like vine-ripened tomatoes, crisp vegetables, zesty peppers and spices, the salsas make a perfect addition to these recipes from celebrity chef and entertainer George Duran, author of “Take This Dish and Twist It” and host of Food Network’s “Ham on the Street” and TLC’s “Ultimate Cake Off.”
Kickoff your menu with an app like these Jalapeno Bacon and Salsa Biscuit Bites that meld together traditional tailgate tastes. Then put a Tex-Mex twist on a traditional favorite with this Enchilada Lasagna, perfect for feeding a crowd of hungry fans.
To round out the playbook, this Layered Mediterranean Hummus Salad can make for an accompaniment to a variety of main courses. The cucumbers, olives, cherry tomatoes and other veggies are balanced by the savory taste of Fresh Cravings Hummus. Made with a short list of high-quality ingredients like chickpeas, tahini and Chilean extra-virgin olive oil, it has a smooth, creamy mouthfeel.
Find more game-winning recipes made for homegating and tailgating at FreshCravings.com.
Layered Mediterranean Hummus Salad
Recipe courtesy of chef George Duran
Servings: 4-6
- 2 containers (10 ounces each) Fresh Cravings Hummus, any flavor
- 1 cup sliced cucumbers
- 1/2 cup Kalamata olives, seeded and roughly chopped
- 1/2 cup canned garbanzo beans, drained
- 1/4 cup crumbled feta cheese
- 3/4 cup cherry tomatoes, quartered
- 1/4 red onion, finely chopped
- 2 tablespoons finely chopped fresh parsley
- 1/2 lemon, juice only
- extra-virgin olive oil
- zaatar, for sprinkling (optional)
- pita bread or tortilla chips
- On bottom of large, flat serving dish or platter, use spoon to evenly spread hummus.
- Layer cucumbers, olives, garbanzo beans, feta cheese, cherry tomatoes, red onion and parsley throughout hummus. Squeeze lemon juice over top.
- Drizzle with olive oil and sprinkle with Zaatar, if desired. Serve immediately with pita bread or tortilla chips.
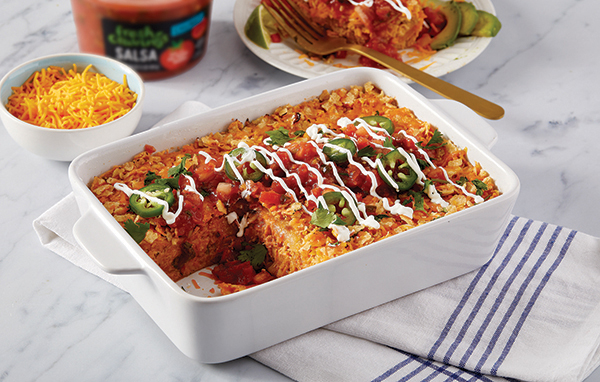
Enchilada Lasagna
Recipe courtesy of chef George Duran
Servings: 4-6
- 2 tablespoons olive oil
- 1 large onion, chopped (1 cup)
- 1 deli roasted chicken, skin and bones removed, shredded
- 2 tablespoons taco seasoning
- 1 cup chicken stock or broth
- 8 ounces cream cheese, at room temperature
- 2 cups shredded Tex-Mex cheese blend
- 16 ounces Fresh Cravings Chunky Salsa, plus additional for serving
- 1 cup fresh cilantro, chopped
- nonstick cooking spray
- 6 flour tortillas (9 inches each)
- 1 cup tortilla chips, crushed
- 1 cup shredded cheddar cheese
- Preheat oven to 350 F.
- In large skillet over medium-high heat, add olive oil. Add onions and cook until soft and translucent, 4-5 minutes.
- Add shredded chicken and stir in taco seasoning. Add chicken broth and bring to simmer, about 5 minutes.
- Add cream cheese, Tex-Mex cheese, salsa and cilantro. Stir until cream cheese is melted and simmer 3-4 minutes until slightly thickened.
- Spray square baking dish with nonstick cooking spray. Place two tortillas in bottom of pan, folding over or trimming sides of tortillas to fit.
- Spoon half chicken mixture over tortillas. Repeat then place remaining tortillas over top. Mix crushed tortilla chips with cheddar cheese and sprinkle over top. Bake 30 minutes, or until lasagna is bubbling and lightly browned.
- Let stand 10 minutes then top with additional salsa before serving.
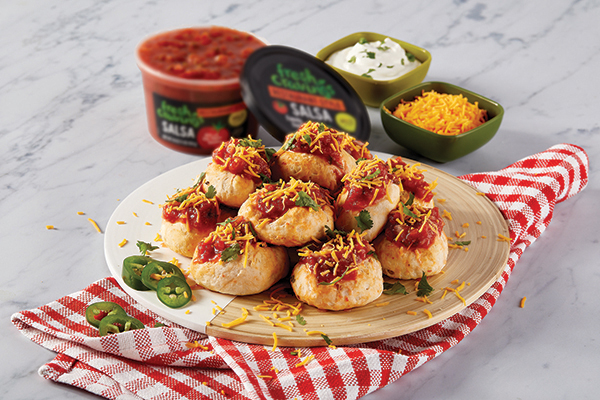
Jalapeno Bacon and Salsa Biscuit Bites
Recipe courtesy of chef George Duran
Yield: 16 biscuit bites
- 1 tube biscuit dough (8 biscuits total)
- 7 ounces grated mozzarella cheese
- 1/4 cup jarred jalapenos, chopped
- 8 slices cooked bacon, chopped
- 1 cup Fresh Cravings Restaurant Style Salsa
- nonstick cooking spray
- Preheat air fryer to 350-360 F.
- Divide each biscuit in half by pulling apart in centers. Use hands to flatten each biscuit into circles. Set aside.
- In bowl, mix mozzarella cheese with chopped jalapenos, bacon and salsa.
- Add heaping spoonful into each flattened biscuit and pinch each together tightly to form balls. Top each with small amount of salsa mixture.
- Spray nonstick cooking spray in air fryer and, working in batches, cook biscuit bites 6-9 minutes until golden brown.
- Serve warm.
- Note: If air fryer access is unavailable, biscuit bites can be baked 8-10 minutes at 400 F in oven, or until golden brown.
SOURCE:
Fresh Cravings
https://stmdailynews.com/category/food-and-beverage

(Family Features) If you’re in a tight spot for a last-minute potluck barbecue, don’t just throw together any salad. This Queso Cheese Corn Salad features a zesty homemade dressing and a salad base with a bit of heat (if you dare). Discover more cookout recipes by visiting Culinary.net.

Queso Cheese Corn Salad
Recipe courtesy of “Cookin’ Savvy”
Servings: 4-6
Dressing:
- 2 limes, juice only
- 1/4 cup mayo
- 1 pinch salt
- 1 tablespoon sugar
- 2 cans whole corn, drained
- 1 cup chopped bell pepper
- 1/4 cup chopped red onion (optional)
- 1 hot pepper (optional)
- 1 cup shredded queso cheese
- freshly chopped cilantro, for garnish
- To make dressing: In bowl, mix lime juice, mayo, salt and sugar.
- In separate large bowl, mix corn; bell pepper; onion, if desired; hot pepper, if desired; and queso cheese.
- Pour dressing over corn mixture and mix well. Top with cilantro.
SOURCE:
Culinary.net
 What’s your favorite food, recipe, or dining spot? Tell us in the comments! Then subscribe to the STM Daily News Food and Drink newsletter for fresh recipes, restaurant news, food trends, and delicious stories delivered straight to your inbox. Join our growing community of food lovers today!

(Family Features) Food insecurity isn’t a new problem in the United States, but the economic upheaval created by the COVID-19 pandemic accelerated the problem.
During the pandemic, households in the United States with children experienced an increase in food insecurity, despite overall rates of food insecurity staying the same. In 2019, 13.6% of households with children were food insecure, but by 2020, that number increased to 14.8%, according to data from the U.S. Department of Agriculture.
In general, child food insecurity rates are higher than overall food insecurity rates, according to the annual Map the Meal Gap study conducted by Feeding America, a nationwide nonprofit network of food banks. According to data from the Children’s Defense Fund, this is particularly prevalent among low-income families, single mother households and Black and Hispanic households.
What Food Insecurity Means for Children
Food insecurity and hunger are closely related but not quite the same. People who are food insecure don’t have reliable, ongoing access to an adequate supply of affordable, nutritious food. Hunger is a physical condition; food insecurity reflects barriers to obtaining food such as finances, physical location and transportation.
Infants and toddlers are particularly vulnerable to nutrient deficiencies because their nutrient needs are high, especially in relation to the size of their stomachs and appetites. Caregivers in food-insecure households may have little choice but to settle for cheaper, energy-dense but nutrient-poor foods. As a result, food-insecure infants and toddlers are not receiving adequate nutrition even when they may be receiving enough calories to satisfy hunger.
Even if a child isn’t physically starving, inadequate nutrition can negatively affect health in numerous ways, including immune system function, low weight, learning and developmental delays, vitamin deficiencies and more.
Ways to Help Promote Better Nutrition
Support good nutrition during infancy and toddlerhood for your own children and others in the community with these practical tips:
- Participate in (or introduce those in need to) aid programs. Government nutrition assistance programs help provide essential nutrition needs during infant and toddler years. One example is the Special Supplemental Nutrition Program for Women, Infants and Children (WIC), which provides a variety of resources including food and health care referrals to support mothers and young children at nutritional risk, including pregnant, breastfeeding and post-partum women, as well as infants and children up to age 5.
Another example is the Supplemental Nutrition Assistance Program (SNAP), which provides benefits low-income families can use to purchase nutritious foods. For children and adults who are enrolled in certain care programs, the Child and Adult Care Food Program (CACFP) helps ensure they have access to nutritious meals and snacks. - Make purchases that work extra hard. In addition to producing foods that encourage better nutrition for children, some brands also make contributions that help offset food insecurity. For example, for every box of Plum Organics Super Smoothies purchased, the company donates a pouch to a child in need through its “The Full Effect” program. The smoothie is a specially formulated blend of fruits, vegetables, legumes and grains with no added sugars designed to fight malnutrition and help fortify the diets of children who don’t have access to regular, healthy meals.
- Act as a role model for healthy choices. Children learn by example, so be sure your little ones see you enjoying nutritious snacks, filling your plate with appropriate portions and preparing well-rounded meals. When kids are exposed to a wide range of healthy options early in life, those food choices become the norm as they grow older.
- Volunteer at a food bank. Getting hands-on by donating your time at a local food bank can help you understand the complexity of food insecurity. Many nutritious selections are perishable, and transporting and storing perishable goods is costly. Volunteers help offset a food bank’s operational expenses by contributing labor to sort donated items, prepare deliveries and more.
To find more information about foods that provide infants and toddlers the nutrients they need, visit plumorganics.com. Photos courtesy of Getty Images
SOURCE:
Plum Organics
https://stmdailynews.com/category/food-and-drink/