recipes
Fire Up the Grill for Favorite Summer Fare
Last Updated on June 25, 2024 by Daily News Staff
(Family Features) Among the many staples of a summer gathering, lighting the grill and enjoying fresh-cooked fare is what makes those moments so special. Bring together your nearest and dearest with favorites straight off the grates to make this summer one to remember.
Pickled Beet Chimichurri Tri-Tip is sure to leave a lasting impression with the succulence of perfectly cooked steak elevated by beet chimichurri. Made with Aunt Nellie’s Diced Pickled Beets that are picked and packed at peak ripeness, they provide a balance of sweetness and vinegar for that familiar homemade flavor.
For a quick-and-easy option that makes dinnertime a cinch, turn to a beloved summer solution: bratwurst. Whether the outer layer is slightly charred or crispy, bratwurst makes it easy on the grill master while giving guests the opportunity to customize with their favorite toppings.
This German Potato Salad Flatbread with Bratwurst and Caramelized Onions recipe combines sliced bratwurst with caramelized onions and cheese for a unique spin on a summer classic. Serving as the base is browned READ German Potato Salad, made with thinly sliced potatoes and bacon in a traditional sweet-piquant dressing.
Find more ways to make summer grilling “grate” at AuntNellies.com and READSalads.com.
Pickled Beet Chimichurri Tri-Tip
Recipe courtesy of “Dad with a Pan”
Prep time: 15 minutes
Cook time: 60-90 minutes, plus 10-15 minutes rest time
Servings: 6-8
Tri-Tip:
- 1 tri-tip roast (2-3 pounds)
- salt, to taste
- pepper, to taste
Chimichurri Beet Sauce:
- 1 jar Aunt Nellie’s Diced Pickled Beets, drained
- 1 cup fresh parsley, roughly chopped
- 1/4 cup fresh cilantro, roughly chopped
- 4 cloves garlic, minced
- 1/4 cup red wine vinegar
- 1/2 cup olive oil
- 1 teaspoon fresh oregano, roughly chopped
- 1/2 teaspoon red pepper flakes, or to taste
- salt, to taste
- pepper, to taste
- To prepare tri-tip: Season tri-tip generously with salt and pepper, to taste, on all sides. Rest at room temperature about 30 minutes.
- To prepare chimichurri beet sauce: In food processor, combine pickled beets, parsley, cilantro, minced garlic, red wine vinegar, olive oil, fresh oregano, red pepper flakes, salt and pepper. Pulse until mixture is well combined and forms chunky sauce. Adjust seasoning, to taste.
- Heat grill to 350 F and prepare for two-zone grilling.
- Place tri-tip over indirect heat. Close lid and grill 30-40 minutes, flipping every 5-7 minutes, until internal temperature reaches 125 F for medium-rare.
- Move tri-tip to direct heat and grill 2-3 minutes per side, or until internal temperature reaches desired doneness (135 F for medium-rare).
- Transfer tri-tip to cutting board and rest 10-15 minutes.
- Slice tri-tip against grain into thin slices. Arrange slices on serving platter and drizzle with chimichurri beet sauce. Serve extra sauce on side for dipping.

German Potato Salad Flatbread with Bratwurst and Caramelized Onions
Recipe courtesy of “Dad with a Pan”
Prep time: 10 minutes
Cook time: 30 minutes
Servings: 4-6
- 2 large onions, thinly sliced
- 2 tablespoons butter
- 4 bratwurst links, sliced crosswise 1/8-inch thick
- 1 can (15 ounces) READ German Potato Salad, drained
- 1 flatbread, approximately 12 inches
- olive oil
- 1 cup shredded gruyere cheese
- fresh chives, chopped, for garnish
- fresh lemon wedges
- Preheat grill to medium-high heat (about 425 F).
- In 12-inch skillet or pan over direct heat, caramelize onions in butter 15-20 minutes. Set aside.
- In same pan, cook sliced bratwursts until browned and cooked through, 7-10 minutes. Set aside.
- In same pan, spread drained German potato salad. Cook until browned, 5-7 minutes. Set aside.
- Brush bottom of flatbread with olive oil.
- Place flatbread directly on grill grates. Layer with browned potato salad, cooked Bratwurst slices, caramelized onions and cheese.
- Close grill lid and cook 8-10 minutes, or until cheese is melted and flatbread is heated through.
- Garnish with chopped chives and serve with fresh lemon wedges.
SOURCE:
Seneca Foods
Seneca Foods
At our core, we at STM Daily News, strive to keep you informed and inspired with the freshest content on all things food and beverage. From mouthwatering recipes to intriguing articles, we’re here to satisfy your appetite for culinary knowledge.
Visit our Food & Drink section to get the latest on Foodie News and recipes, offering a delightful blend of culinary inspiration and gastronomic trends to elevate your dining experience.
https://stmdailynews.com/category/food-and-beverage
You can also find food and beverage-related videos on our YouTube channel, where we regularly post new content and share tips, recipes, and demonstrations. https://youtube.com/playlist?list=PLEhXBupt8tVynuUhpQZMxQt4lvPmOiAtQ&si=InDwc7YaB0KIwmxy
Author
Discover more from Daily News
Subscribe to get the latest posts sent to your email.


Last Updated on March 13, 2026 by Daily News Staff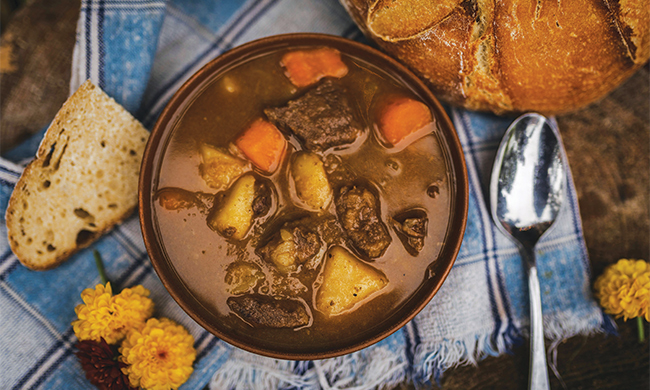
(Feature Impact) Green beer and decor may get all the attention, but for hosts looking to wow their St. Patrick’s Day guests or astound their loved ones, a traditional Irish recipe can become an annual tradition. Celebrate the luck o’ the Irish with this St. Patrick’s Day Stew, a hearty, beefy meal loaded with chuck stew meat, potatoes, carrots, onions and, of course, stout beer.
To find more recipes that put tradition center stage, visit Culinary.net.
St. Patrick’s Day Stew
Recipe adapted from Simply Recipes
Prep time: 30 minutes
Cook time: 1 hour, 40 minutes
Servings: 6
- 1 1/4 pounds marbled chuck beef stew meat, cut into 1 1/2-inch chunks
- 1 teaspoon salt, plus additional to taste, divided
- 1/4 cup extra-virgin olive oil
- 6 garlic cloves, minced
- 4 cups beef stock
- 2 cups water
- 1 cup extra stout beer
- 1 cup red wine
- 2 tablespoons tomato paste
- 1 tablespoon sugar
- 1 tablespoon dried thyme
- 1 tablespoon Worcestershire sauce
- 2 bay leaves
- 2 tablespoons butter
- 1 large onion, chopped
- 4 carrots, cut into 1/2-inch pieces
- 3 pounds russet potatoes, peeled and cut into 1/2-inch pieces
- freshly ground black pepper, to taste
- 2 tablespoons chopped fresh parsley
- Sprinkle beef chunks with 1 teaspoon salt. In large pot over medium-high heat, heat olive oil.
- Pat beef dry with paper towels and add to pot, working in batches to avoid crowding pot. Cook until browned on one side then flip and brown.
- Add garlic cloves to pot with beef and saute 30 seconds, or until fragrant. Add beef stock, water, beer, wine, tomato paste, sugar, thyme, Worcestershire sauce and bay leaves. Stir.
- Bring mixture to simmer then reduce heat to low. Cover and simmer 1 hour, stirring occasionally.
- In separate pot over medium heat, melt butter. Add onions and carrots; saute until golden, about 15 minutes.
- After beef mixture simmers 1 hour, add onions, carrots and potatoes. Season with salt and pepper, to taste. Simmer uncovered until beef and vegetables are tender, about 40 minutes. Discard bay leaves and spoon excess fat.
- Sprinkle with parsley and serve.
Photo courtesy of Unsplash

SOURCE:
At our core, we at STM Daily News, strive to keep you informed and inspired with the freshest content on all things food and beverage. From mouthwatering recipes to intriguing articles, we’re here to satisfy your appetite for culinary knowledge.
Visit our Food & Drink section to get the latest on Foodie News and recipes, offering a delightful blend of culinary inspiration and gastronomic trends to elevate your dining experience. https://stmdailynews.com/food-and-drink/
Discover more from Daily News
Subscribe to get the latest posts sent to your email.
recipes
A Delightful Bite for a Bit O’ Luck
Going green for St. Patrick’s Day can stretch beyond beer, clothes and decor – it can even make its way to the dessert table. With a classic recipe and a dash of green food coloring, these Luck O’ the Irish Cupcakes offer a sweet-tooth-satisfying bite as you gather friends and family for the festivities.

A Delightful Bite for a Bit O’ Luck
(Feature Impact) Going green for St. Patrick’s Day can stretch beyond beer, clothes and decor – it can even make its way to the dessert table. With a classic recipe and a dash of green food coloring, these Luck O’ the Irish Cupcakes offer a sweet-tooth-satisfying bite as you gather friends and family for the festivities.
Find more holiday-worthy nibbles and noshes throughout the year at Culinary.net.
Luck O’ the Irish Cupcakes
Recipe adapted from Delish
Prep time: 30 minutes
Cook time: 1 hour
Yield: 12 cupcakes
Cupcakes:
- 1 2/3 cups all-purpose flour
- 1 1/2 teaspoons baking powder
- 1/4 teaspoon baking soda
- 1/4 teaspoon kosher salt
- 1 cup granulated sugar
- 3/4 cup (1 1/2 sticks) unsalted butter, softened
- 3 large egg whites, at room temperature
- 1 tablespoon pure vanilla extract
- 1/2 cup full-fat sour cream, at room temperature
- 1/2 cup whole milk, at room temperature
Frosting:
- 1 cup (2 sticks) unsalted butter, softened
- 4 cups powdered sugar
- 3 tablespoons heavy cream
- 2 teaspoons pure vanilla extract
- 1/8 teaspoon kosher salt
- green food coloring
- To make cupcakes: Preheat oven to 350 F and arrange rack in center of oven. Line 12-cup muffin tin with paper liners. In medium bowl, whisk flour, baking powder, baking soda and salt.
- In large bowl, using handheld mixer on medium-high speed, beat granulated sugar and butter until light and fluffy, 3-4 minutes. Add egg whites and vanilla; beat until smooth, about 2 minutes. Add sour cream and beat until combined.
- Add half of dry ingredients to wet ingredients. Beat on low until incorporated. Add milk and beat to combine. Add remaining dry ingredients and beat until combined.
- Add batter to liners until three-quarters full. Bake 19-22 minutes, until slightly golden on top.
- Remove cupcakes from pan and cool completely.
- To make frosting: In large bowl, using handheld mixer on medium-high speed, beat butter until fluffy. Add powdered sugar and beat until combined. Add heavy cream, vanilla and salt; beat until combined. Mix in green food coloring.
- Transfer frosting to piping bag and pipe frosting onto cupcakes.
Photo courtesy of Unsplash

SOURCE:
At our core, we at STM Daily News, strive to keep you informed and inspired with the freshest content on all things food and beverage. From mouthwatering recipes to intriguing articles, we’re here to satisfy your appetite for culinary knowledge.
Visit our Food & Drink section to get the latest on Foodie News and recipes, offering a delightful blend of culinary inspiration and gastronomic trends to elevate your dining experience. https://stmdailynews.com/food-and-drink/
Discover more from Daily News
Subscribe to get the latest posts sent to your email.
Food and Beverage
Manage Busy Spring Schedules with Simple, Nutritious Bowls
To manage busy spring schedules, prepare simple, nutritious bowls at home instead of relying on takeout. Recipes like Chicken and Rice Bowls with Peanut Sauce and Greek-Inspired Power Bowls are quick, customizable, and packed with flavors. Visit DudaFresh.com for more healthy recipes that fit your family’s tastes.

Manage Busy Spring Schedules with Simple, Nutritious Bowls
(Feature Impact) When jam-packed calendars and seemingly constant takeout orders get you down, diving into a fresh way to rethink homecooked meals can get you and your loved ones into a better-for-you routine.
Close your favorite food delivery app and instead break out the bowls for simple yet nutritious recipes that are equal parts filling and fresh. Easily prepped ahead of time, dishes like Chicken and Rice Bowls with Peanut Sauce provide powerful protein and flavor without the hassle. For added pizzazz, drizzle with extra peanut sauce and squeeze a dash of lime juice.
Or put a tangy twist on a traditional chicken bowl with these Greek-Inspired Power Bowls featuring homemade tzatziki made with Dandy Celery, a naturally sweeter, crispier and less stringy alternative to other celeries. Celebrating its 100th anniversary, it delivers the ultimate snack time (or dinner) crunch and flavor, offering a satisfying complement to sliced chicken, mixed greens, whole-grain quinoa and Kalamata olives.
An added bowl-inspired bonus: These family-friendly recipes can be personalized for taste preferences so no one goes hungry.
Rethink your family’s menu with more quick, nutritious recipes to alleviate the stress of hectic schedules by visiting DudaFresh.com.
Chicken and Rice Bowls with Peanut Sauce
Recipe courtesy of The Produce Moms
Prep time: 7 minutes
Cook time: 5 minutes
Servings: 2
Creamy Peanut Sauce:
- 1 1/2 tablespoons soy sauce
- 1 tablespoon freshly squeezed lime juice
- 2 teaspoons rice vinegar
- 1 teaspoon honey
- 1/4 cup creamy peanut butter
- 1 tablespoon toasted sesame oil
Bowls:
- 1 tablespoon olive oil
- 1 cup cooked, shredded chicken
- 1 cup cooked brown or jasmine rice
- 1 cup Dandy celery, julienned
- 1 cup shredded carrot
- 1/2 medium English cucumber, thinly sliced
- 1/4 cup unsalted roasted peanuts, coarsely chopped
- lime wedges, for serving
- To prepare peanut sauce: In small bowl, whisk soy sauce, lime juice, rice vinegar and honey. Add peanut butter and sesame oil. Whisk vigorously until sauce is completely smooth and creamy. Set aside.
- To prepare bowls: In nonstick 12-inch skillet over medium-high heat, heat olive oil until simmering. Add shredded chicken and about 3 tablespoons peanut sauce. Stir constantly to coat chicken and heat through, about 3 minutes. Remove from heat and set aside.
- To assemble rice bowls: In deep serving bowls, add cooked rice. Top with warm chicken covered in peanut sauce. Arrange celery, carrot and cucumber around chicken. Top with peanuts.
- Drizzle remaining peanut sauce over bowls. Serve with lime wedges to squeeze over bowls.

Greek-Inspired Power Bowls
Recipe courtesy of Anastasiia de la Cruz
Prep time: 20 minutes
Cook time: 15 minutes
Servings: 2
Celery Tzatziki:
- 1 cup plain, full-fat Greek yogurt
- 1/2 cup finely chopped Dandy celery
- 1 tablespoon extra-virgin olive oil
- 1 tablespoon fresh lemon juice
- 1 small garlic clove, finely grated
- 2 tablespoons chopped walnuts (optional)
- salt, to taste
- pepper, to taste
Bowls:
- 2 cups mixed greens
- 1 1/3 cups cooked, gluten-free, whole-grain quinoa
- 2 large grilled chicken breasts (about 6 ounces each), sliced
- 1/2 cup hummus
- 1/4 cup Kalamata olives, halved
- 1 tablespoon extra-virgin olive oil, for drizzling
- fresh herbs, for garnish
- To make celery tzatziki: Mix yogurt, celery, olive oil, lemon juice, garlic and walnuts, if desired. Season with salt and pepper, to taste. Stir well. Chill.
- To assemble bowls: In two bowls, layer greens and cooked quinoa evenly. Top with grilled chicken.
- Spoon 1/4 cup hummus on side of each bowl. Add olives, 2-3 tablespoons tzatziki and drizzle with olive oil.
- Sprinkle with fresh herbs.
<img src="https://ssl.google-analytics.com/collect?v=1&tid=UA-482330-7&cid=1955551e-1975-5e52-0cdb-8516071094cd&sc=start&t=pageview&dl=http%3A%2F%2Ftrack.familyfeatures.com%2F17834%2F10247&dt=MANAGE-BUSY-SPRING-SCHEDULES-WITH-SIMPLE-NUTRITIOUS-BOWLS" />
<img src="https://erp.featureimpact.com/api/v1/tracking/17834/10247/track.gif" />SOURCE:
Discover more from Daily News
Subscribe to get the latest posts sent to your email.