Food and Beverage
Elija Cereales Integrales para Tener un Corazón Sano
Last Updated on July 14, 2024 by Daily News Staff
(Family Features) Comer sano es una prioridad para muchos estadounidenses, pero saber por dónde empezar y con qué alimentos puede ser un poco complicado. Una forma de aumentar el valor nutricional de sus comidas es conocer mejor los granos integrales y comprender por qué son importantes para tener un régimen de alimentación saludable para el corazón.
Como elementos clave de un régimen de alimentación beneficioso para el corazón, los cereales integrales como el sorgo, la avena y el arroz integral son fuentes ricas en fibra dietética, pueden mejorar los niveles de colesterol en la sangre y proporcionar nutrientes que ayudan al cuerpo a formar nuevas células, regular la tiroides y mantener un sistema inmunológico saludable.
Sin embargo, según una encuesta realizada por The Harris Poll en nombre de la American Heart Association, los adultos estadounidenses tienen menos conocimientos sobre los granos refinados frente a los integrales en comparación con otras categorías de alimentos como las frutas, las verduras y las proteínas. Además, cuando se les pidió que identificaran los granos integrales y los granos refinados, nos encontramos con que la mayoría de los adultos cree incorrectamente que el pan multigrano es un pan con granos integrales y solo el 17 % cree que el sorgo es un ejemplo de grano integral cuando, de hecho, es una opción nutritiva de grano integral.
Si está buscando probar más granos integrales, el sorgo es un ingrediente principal en estas recetas saludables para el corazón de panqueques con salsa de vainilla y arándanos,muffins streuselde frambuesa y salteado de sorgo con verduras de la huerta. Estos sabrosos platos pueden ser parte de un régimen de alimentación saludable en general, según lo recomendado por la iniciativa Healthy for Good de la American Heart Association, respaldada por Sorghum Checkoff.
Encuentre más ideas de comidas saludables para el corazón en Heart.org/healthyforgood.
Muffins Streusel de Frambuesa
Receta cortesía de la American Heart Association y Sorghum Checkoff
Porciones: 12 (1 muffin por porción)
Muffins:
- Aceite en aerosol antiadherente
- 1 1/2 tazas de harina de sorgo integral
- 1 cucharadita de canela molida
- 3/4 cucharadita de bicarbonato de sodio
- 3/4 taza de suero de leche descremada
- 1/3 taza de azúcar rubia bien compactada
- 3 claras de huevo grandes
- 1/4 taza de aceite de canola o de maíz
- 2 cucharaditas de ralladura de limón
- 1 cucharadita de extracto de vainilla
- 1 taza de frambuesas sin azúcar frescas o congeladas, descongeladas si están congeladas
Streusel:
- 2 cucharadas de harina de sorgo integral
- 2 cucharadas de azúcar rubio
- 2 cucharadas de copos de avena de cocción rápida sin cocer
- 2 cucharadas de nueces pecanas picadas
- 2 cucharadas de margarina blanda de bajo contenido graso.
- 1/2 cucharadita de canela molida
- Para hacer los muffins: Precalentar el horno a 400 °F. Rociar ligeramente un molde para muffins de 12 tazas con spray antiadherente para cocinar.
- En un tazón grande, mezclar la harina de sorgo, la canela y el bicarbonato de sodio.
- En un tazón mediano, batir el suero de leche, el azúcar moreno, las claras de huevo, el aceite, la ralladura de limón y la vainilla. Agregar la mezcla de harina hasta que la masa esté apenas humedecida y no quede harina sin mezclar. Colocar la masa en moldes para muffins. Cubrir cada muffin con frambuesas.
- Para hacer el streusel: En un tazón pequeño, mezclar la harina de sorgo, el azúcar rubia, la avena, las nueces, la margarina y la canela para lograr una textura de migas gruesas. Espolvorear sobre los panecillos, empujando suavemente hacia la masa. Hornear durante 16 minutos o hasta que al insertar un palillo de madera en el centro, éste salga limpio. El USDA recomienda cocinar los platos que tengan huevo a 160 °F.
- Colocar la bandeja en la rejilla para enfriar. Dejar reposar 5 minutos. Con cuidado transfiera los muffins a la rejilla. Dejar enfriar por completo, unos 20 minutos.
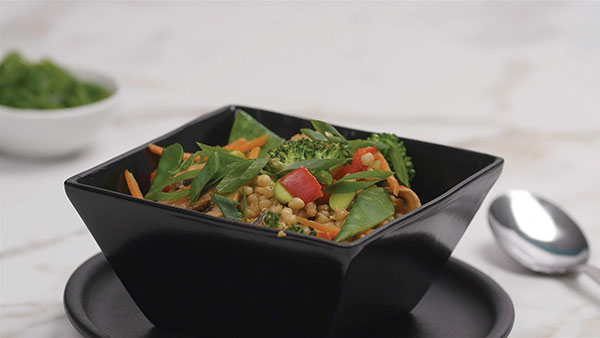
Sorgo Salteado con Vegetales de la Huerta
Receta cortesía de la American Heart Association y Sorghum Checkoff
Porciones: 4 (1 1/2 tazas por porción
- 1 taza de sorgo integral crudo
- 2 cucharaditas de aceite de sésamo tostado
- 2 dientes de ajo medianos, picados
- 1 cucharadita de raíz de jengibre, pelada y picada
- 1 taza de floretes de brócoli frescos o congelados, picados, si están congelados descongélelos
- 1 taza de tirabeques, cortados y partidos por la mitad
- 1/2 taza de tiras de zanahoria, cortadas en palitos
- 1/2 taza de pimiento rojo, cortado en cubitos
- 1/2 taza de champiñones, en rodajas finas
- 1/2 taza de edamame sin cáscara congelado, descongelado
- 2 huevos grandes
- 2 cucharadas de salsa de soja baja en sodio, cantidad dividida
- 1/2 taza de castañas de agua, enjuagadas y escurridas
- 1/4 taza de cebollas verdes, rebanadas en diagonal
- Prepare el sorgo siguiendo las instrucciones del paquete, no le ponga la sal. Una vez cocido, extienda el sorgo en una capa uniforme sobre una bandeja para hornear con borde o una fuente para hornear de 13 por 9 por 2 pulgadas. Deje reposar de 5 a 10 minutos a temperatura ambiente. Refrigere, sin tapar, 20 minutos o hasta que se enfríe.
- En una sartén antiadherente mediana a fuego medio, caliente el aceite, y asegúrese de cubrir el fondo. Cocine el ajo y la raíz de jengibre durante 30 segundos, revuelva con frecuencia. Aumente el fuego a medio-alto. Cocine el brócoli, los guisantes, las zanahorias, el pimiento, los champiñones y el edamame de 10 a 12 minutos, o hasta que las verduras estén tiernas pero crujientes, revuelva con frecuencia.
- En un tazón pequeño, con un tenedor, bata los huevos y 1 cucharada de salsa de soja.
- Reduzca el fuego a bajo. Agregue las castañas de agua y el sorgo a la mezcla de verduras. Empuje la mezcla a los lados de la sartén. Vierta la mezcla de huevo en el centro de la sartén. Use una espátula de goma resistente al calor y revuelva de 1 a 2 minutos o hasta que esté parcialmente cocido.
- Mezcle las verduras en el huevo parcialmente cocido. Cocine 1 minuto, o hasta que los huevos estén bien cocidos y el sorgo esté bien caliente, revuelva constantemente. El USDA recomienda cocinar los platos que tengan huevo a 160 °F.
- Retirar del calor. Agregue la salsa de soja restante. Espolvoree con las cebollas verdes.
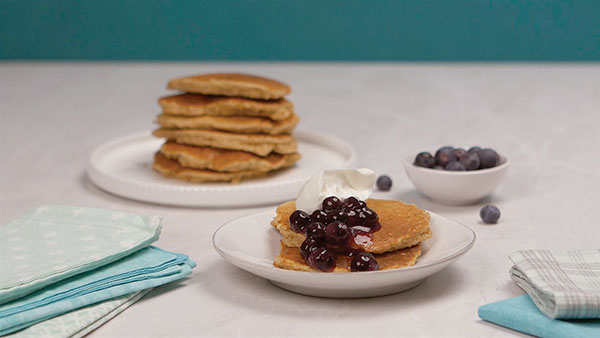
Panqueques con Salsa de Vainilla y Arándanos
Receta cortesía de la American Heart Association y Sorghum Checkoff
Porciones: 4 (2 panqueques, 1/4 taza de salsa y 2 cucharadas de yogur por porción)
Salsa:
- 2 cucharadas de maicena
- 1/3 vaso de agua
- 1 taza de arándanos
- 1 cucharada de azúcar
- 1 1/2 cucharaditas de extracto de vainilla
Panqueques:
- 1/2 taza de copos de avena de cocción rápida
- 1/2 taza de harina de sorgo integral
- 1 1/2 cucharadas de azúcar rubia bien compactada
- 1 1/2 cucharaditas de polvo de hornear
- 1/2 cucharadita de canela molida
- 1/2 taza de leche descremada
- 1/2 taza de puré de manzana sin azúcar
- 1 huevo grande
- 1 cucharada de aceite de canola o de maíz
Cobertura
- 1/2 taza de yogur griego natural descremado
- Para hacer la salsa: Poner la maicena en una cacerola mediana. Agregar agua y revolver para disolver la maicena. Agregar los arándanos y el azúcar. Llevar a ebullición a fuego medio-alto. Hervir 1-2 minutos, o hasta que la salsa se espese un poco. Retirar del calor. Agregar la vainilla. Taparlo para mantener el calor. Reservar.
- Para hacer los panqueques: En un tazón mediano, mezclar la avena, la harina de sorgo, el azúcar morena, el polvo de hornear y la canela.
- En un tazón pequeño, batir la leche, el puré de manzana, el huevo y el aceite. Agregar la mezcla de harina hasta que la masa esté apenas humedecida y no quede harina sin mezclar.
- Calentar la plancha antiadherente a fuego medio. Probar la temperatura rociando gotas de agua en la plancha. La plancha está lista cuando el agua se evapora rápidamente.
- Verter 1/4 taza de masa para cada panqueque en la plancha. Cocinar de 2 a 3 minutos, o hasta que aparezcan pequeñas burbujas en la superficie y la parte de abajo esté dorada. Dar vuelta los panqueques. Cocinar de 1 a 2 minutos, o hasta que esté completamente cocido y tenga la base dorada. El USDA recomienda cocinar los platos que tengan huevo a 160 °F.
- Colocar los panqueques en los platos. Verter la salsa sobre los panqueques. Cubrir cada porción con 2 cucharadas de yogur.
SOURCE:
American Heart Association
At our core, we at STM Daily News, strive to keep you informed and inspired with the freshest content on all things food and beverage. From mouthwatering recipes to intriguing articles, we’re here to satisfy your appetite for culinary knowledge.
Visit our Food & Drink section to get the latest on Foodie News and recipes, offering a delightful blend of culinary inspiration and gastronomic trends to elevate your dining experience.
https://stmdailynews.com/category/food-and-beverage
You can also find food and beverage-related videos on our YouTube channel, where we regularly post new content and share tips, recipes, and demonstrations. https://youtube.com/playlist?list=PLEhXBupt8tVynuUhpQZMxQt4lvPmOiAtQ&si=InDwc7YaB0KIwmxy
Author
Discover more from Daily News
Subscribe to get the latest posts sent to your email.


Food and Beverage
Savory, Satisfying Ideas for Lunch and Dinner
Lunch or Dinner. During cold and flu season, enhance meals with versatile pearl couscous, which elevates comfort food offerings. Try recipes like Italian Penicillin Soup and Simple Lemon Butter Couscous for hearty, satisfying dishes.
Last Updated on March 3, 2026 by Daily News Staff
(Family Features) When cold and flu season calls for savory and satisfying meals, remember you don’t have to be sick to enjoy the best this time of year has to offer. Skip the same old soups and stews, though, and level up your comfort food cache with the flavor and versatility of pearl couscous.
Distinguished from traditional Moroccan couscous by its slightly larger and rounder shape, plus its less dense, firmer consistency, pearl couscous is thoroughly versatile and a perfect fit for cold weather classics. With Success Boil-in-Bag Pearl Couscous, you get high-quality semolina wheat pearl couscous made just right. After the water boils, it’s ready in under 7 minutes and prepared similarly to pasta.
It features a slightly nutty flavor on its own but can absorb any flavors of soups and salads while retaining its density and chewy texture. You can use it in your family’s meals to complement a range of greens, veggies, fish, meats and stews, making it a pantry staple to keep on hand throughout the year.
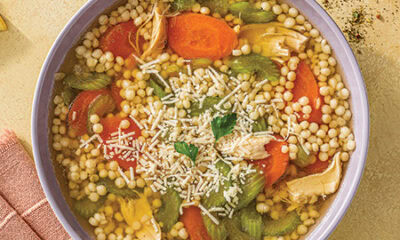
A hearty solution, this Italian Penicillin Soup is ideal for those feeling under the weather or simply craving a filling meal after a chilly day. It’s loaded with rotisserie chicken, tender veggies and pearl couscous simmered in broth then finished with fresh lemon, Parmesan cheese and parsley for a meal that’s as satisfying as it is appetizing.
Elegant in its simplicity, this Simple Lemon Butter Pearl Couscous is a perfect partner for grilled seafood, chicken or vegetables. Easy to serve as a standalone dish or a savvy side that practically cooks itself, you can add this highly versatile grain to your family’s menu any day of the week – whether you’re cooking for a crew or just two – and enjoy steamy leftovers for a light lunch.
Don’t let the cold sap your creativity in the kitchen; turning to versatile, flavorful ingredients can make winter meals a cinch. Discover more pearl couscous-inspired dinner ideas by visiting SuccessRice.com.
Italian Penicillin Soup
Prep time: 10 minutes
Cook time: 15 minutes
Servings: 4
- 2 bags Success Pearl Couscous
- 4 cups low-sodium chicken broth
- 1 cup carrots, sliced
- 1 cup celery, sliced
- 2 cloves garlic, minced
- 1 cup rotisserie chicken, shredded
- 1 teaspoon Italian seasoning
- 1 teaspoon salt
- 1/2 teaspoon pepper
- 4 lemon wedges
- shredded Parmesan cheese, for garnish
- chopped fresh parsley, for garnish
- Prepare pearl couscous according to package directions.
- In large pot, bring broth to boil. Add carrots, celery and garlic. Reduce heat to medium-low and cook 5 minutes until vegetables are slightly tender.
- Add chicken and Italian seasoning; simmer 5 minutes. Add pearl couscous and cook 5 minutes. Season with salt and pepper.
- Ladle soup into four bowls and squeeze fresh lemon wedge into each bowl. Garnish with Parmesan and parsley.

Simple Lemon Butter Pearl Couscous
Prep time: 5 minutes
Cook time: 10 minutes
Servings: 4
- 1 bag Success Pearl Couscous
- 3 lemons, juice only, plus 1 teaspoon zest
- 2 tablespoons butter
- 1 small shallot, finely diced
- 1 tablespoon fresh parsley, finely chopped
- Prepare pearl couscous according to package directions, adding lemon juice to water.
- In small pan, melt butter over medium heat. Add shallots and lemon zest. Cook 3 minutes. Stir pearl couscous into pan.
- Divide pearl couscous into four bowls and top with parsley.
SOURCE:
https://stmdailynews.com/the-fate-of-lucky-supermarkets-in-socal/
Discover more from Daily News
Subscribe to get the latest posts sent to your email.
Food and Beverage
Easy, Approachable Solutions for At-Home Lenten Meals
At-Home Lenten Meals: Lent is an opportunity for families to explore new seafood flavors, making mealtime enjoyable. Simple recipes, like One-Pot Creamy Shrimp Scampi, encourage kids to confidently try seafood, enhancing family meals.
Easy, Approachable Solutions for At-Home Lenten Meals
(Feature Impact) Lent has long been a season of tradition and reflection, and it can also be an opportunity to introduce your family to exciting new flavors that may become staples in your kitchen.
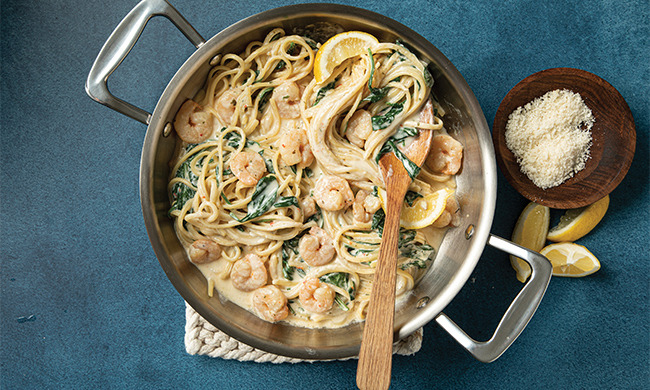
If preparing seafood feels intimidating, try starting with dishes that are easy, familiar and approachable. For example, One-Pot Creamy Shrimp Scampi features a velvety sauce, earthy spinach and buttery, delicious shrimp – a recognizable and approachable recipe that can be a gateway to discovery.
Made with SeaPak frozen shrimp, you can help picky eaters in your home feel more confident in saying “yes” to something new. Frozen seafood is a perfect partner for familiar favorites like pasta, making it a playful, stress-free solution for encouraging exploration at mealtime.
“For many families, Lent often brings a shift at the dinner table – and this year, parents are turning it into an opportunity to try something new,” said Diana Rice, child nutritionist and registered dietitian. “When food feels approachable, it lowers stress for everyone. Familiar flavors help kids say ‘yes’ more often, and those positive moments can make seafood a feel-good part of family meals during Lent and beyond.”
When kids see foods that look and taste familiar – like the crunch of crispy fried shrimp – they may feel more comfortable giving it a try. That’s why discovery can extend beyond the dinner table to snack time, too.
Give kiddos the energy they need for homework assignments with Butterfly Shimp Bruschetta, a quick solution for after-school or weekend snacking. As your pickier loved ones dive in for something new, those small wins can build confidence to try new things – one bite at a time.
This Lent, swap “giving up” for “try this” with more approachable frozen seafood solutions and family-friendly recipes at SeaPak.com.
//www.youtube.com/embed/006rXnSXZGY
One-Pot Creamy Shrimp Scampi
Prep time: 5 minutes
Cook time: 25 minutes
Servings: 4
- 1 package (12 ounces) SeaPak Shrimp Scampi
- 1 1/4 cups half-and-half or milk
- 1 1/4 cups chicken stock
- 8 ounces linguine noodles
- 6 cups fresh spinach
- 1/4 cup grated Parmesan cheese
- 4 lemon wedges
- In large, high-sided saute pan, add shrimp and cook according to package directions. Remove shrimp to bowl and keep warm.
- In same pan with scampi sauce, stir in half-and-half and stock. Bring to low boil. Add pasta. Cook, stirring occasionally, until pasta is cooked al dente, 8-10 minutes.
- Stir in spinach and cook just until beginning to wilt. Stir reserved shrimp into pan.
- To serve, divide shrimp scampi between four bowls and top each with grated Parmesan. Serve with lemon wedges.

Butterfly Shrimp Bruschetta
Prep time: 15 minutes
Cook time: 15 minutes
Servings: 6
- 1 package (9 ounces) SeaPak Jumbo Butterfly Shrimp
- 1 baguette
- 3 garlic cloves, divided
- 6 tablespoons olive oil, divided
- 3 cups grape or cherry tomatoes, seeded and finely diced
- 1/3 cup chopped basil, plus additional for garnish
- salt, to taste
- pepper, to taste
- Preheat oven to 425 F. Bake shrimp according to package directions and keep warm.
- Slice baguette to match number of shrimp. Rub one garlic clove over one side of each slice of bread. Brush garlic-rubbed sides with 3 tablespoons olive oil. Set aside.
- Finely dice remaining garlic.
- In medium mixing bowl, stir tomatoes, remaining olive oil, diced garlic and 1/3 cup chopped basil. Season with salt and pepper, to taste, and set aside.
- In large, hot skillet, working in batches, add baguette slices oil sides down and cook until browned around edges. Remove from pan.
- Top each baguette slice with small spoonful of tomato mixture and one shrimp. Garnish with basil leaf.

SOURCE:
At our core, we at STM Daily News, strive to keep you informed and inspired with the freshest content on all things food and beverage. From mouthwatering recipes to intriguing articles, we’re here to satisfy your appetite for culinary knowledge.
Visit our Food & Drink section to get the latest on Foodie News and recipes, offering a delightful blend of culinary inspiration and gastronomic trends to elevate your dining experience. https://stmdailynews.com/food-and-drink/
Author
Discover more from Daily News
Subscribe to get the latest posts sent to your email.
Blue Apron just picked up a new win in the prepared-meals space.

Consumer365 has recognized Blue Apron as the Best Prepared Meal Delivery Service (2026), pointing to the company’s chef-curated recipes and its growing lineup of ready-to-eat meals built for busy, time-constrained households. The recognition reflects growing consumer demand for convenient food options that reduce cooking time without sacrificing quality, structure, or variety.
Why prepared meals keep winning right now
The press release frames prepared meal delivery as a practical middle ground between cooking from scratch and defaulting to fast food or repetitive takeout.
Consumer365 notes the appeal comes down to a few clear benefits:
- Less time spent cooking (and less cleanup)
- Predictable portions and easier meal planning
- Reduced food waste, since you’re not buying full-size ingredients you may not use
- Flexibility for solo diners or households with irregular schedules
Prepared meals are especially useful during the workweek, when the friction of cooking can push people toward faster—but not always better—options.
What Consumer365 highlighted about Blue Apron
Consumer365’s recognition focuses on how Blue Apron has expanded beyond meal kits while keeping a consistent culinary identity.
Chef-curated structure across product lines
A key point: prepared meals under Dish by Blue Apron are developed by the same in-house culinary team behind Blue Apron’s meal kits. Consumer365 says that continuity helps maintain consistency in flavor development, portioning, and ingredient selection across different formats.
Refrigerated (not frozen) and fast to heat
Dish by Blue Apron meals arrive fully cooked and refrigerated (not frozen). Each meal is packaged as a single serving and designed to reheat in either a microwave or conventional oven.
Most dishes are ready in five to ten minutes, making them a solid option for lunches, quick dinners, or nights when cooking time is limited.
Rotating menus and nutrition standards
Consumer365 also points to weekly rotating menus that span a range of styles, including seafood-based dishes, vegetable-forward meals,
About Blue Apron
Blue Apron launched in 2012 and says it has delivered more than 600 million meals nationwide. The company describes itself as a flexible mealtime brand with a weekly rotating menu of 100+ meals, including pre-made options and meal kits. Blue Apron is also part of Wonder.
Read more
The full review is available at Consumer365.org.
At our core, we at STM Daily News, strive to keep you informed and inspired with the freshest content on all things food and beverage. From mouthwatering recipes to intriguing articles, we’re here to satisfy your appetite for culinary knowledge.
Visit our Food & Drink section to get the latest on Foodie News and recipes, offering a delightful blend of culinary inspiration and gastronomic trends to elevate your dining experience. https://stmdailynews.com/food-and-drink/
Authors
Discover more from Daily News
Subscribe to get the latest posts sent to your email.