home gardening
How to Effectively Seed Your Lawn for Fall
Last Updated on October 10, 2025 by Daily News Staff
How to Effectively Seed Your Lawn for Fall
(Family Features) Due to cooler temperatures and increased moisture levels, fall provides ideal conditions to help your lawn establish strong roots before winter sets in. While the soil retains warmth from the summer months, the cooler weather minimizes the risk of weeds, allowing the new grass to thrive without as much competition or intense summer sun.
Transform your lawn this autumn with these seeding tips for a lush, green yard next spring.
Choose the Right Seed for Your Region
Consider the climate of your region when choosing grass seed. Cool-season grasses, such as Kentucky bluegrass and fescue, thrive in northern regions, while warm-season grasses like Bermuda and Zoysia are better suited for southern climates. Choosing the right seed blend can also help address issues such as shade, drought and wear.
Prepare Soil for Optimal Growth
Start by testing your soil’s pH (a measure of how acidic or basic a substance is) and nutrient levels. Most grasses thrive in soil with a pH level between 6-7 (on a scale to 14). Next, aerate the soil to alleviate compaction and improve seed-to-soil contact, which allows for better water infiltration and root growth, and remove debris, rocks and weeds from the area to create an optimal environment for new grass to grow.
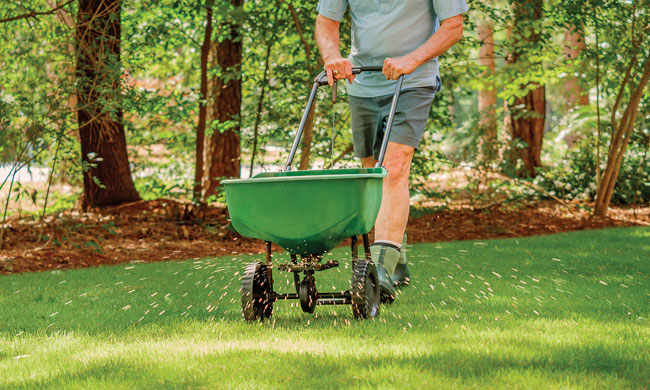
Apply Seed for a Dense, Healthy Lawn
For even distribution of seeds, use a broadcast spreader to apply half the seed in one direction and the remaining seed perpendicular to the first pass to ensure thorough coverage. Lightly rake the soil to incorporate seeds then use a roller to press them into the ground. Light, frequent watering is best until the seeds germinate and grass begins to grow.
Find more fall lawn care tips by visiting eLivingtoday.com.
Photo courtesy of Shutterstock
SOURCE:
Our Lifestyle section on STM Daily News is a hub of inspiration and practical information, offering a range of articles that touch on various aspects of daily life. From tips on family finances to guides for maintaining health and wellness, we strive to empower our readers with knowledge and resources to enhance their lifestyles. Whether you’re seeking outdoor activity ideas, fashion trends, or travel recommendations, our lifestyle section has got you covered. Visit us today at https://stmdailynews.com/category/lifestyle/ and embark on a journey of discovery and self-improvement.
Author

home gardening
Grow Healthier Plants (and Use Less Water) by Improving Your Soil
Biochar enhances soil health by improving water retention and nutrient availability, supporting stronger plant growth. It offers a sustainable solution by sequestering carbon and can also be used for composting and livestock bedding.

(Feature Impact) Almost every gardener knows the frustration: One corner of the garden bursts with life while another struggles to hang on. Flowers are slow to open, vegetables disappoint and the soil seems to drink up water and ask for more.
However, seasoned gardeners know the difference between a struggling garden and a thriving one almost always comes down to what’s beneath the surface.
Success Runs Soil Deep
The change in seasons can leave soil compacted and depleted, so spending some time giving it a boost can set the stage for strong, healthy plants. It may also be easier than many gardeners think to give soil the help it needs. Blending in amendments like biochar improves soil health, helps retain water and locks in nutrients.
An easy-to-use yet powerful conditioner that helps balance soil pH, Wakefield BioChar boosts soil fertility and supports stronger, healthier plant growth. Once it’s mixed into soil, biochar becomes a powerhouse worker. It holds onto water like a sponge, slowly releasing and making the water accessible, so plants continually receive moisture and gardeners need to water less. It also makes nutrients more available to plants, resulting in healthier gardens and greener lawns.
 An Easy-to-Use Boost
When planting in the garden or pots, biochar should make up approximately 10% of the soil mix. If you’re setting up a garden bed, mix it into the soil to a depth of 4-6 inches (1 cubic foot is plenty for a 4-by-8-foot garden bed). For trees and shrubs, adding biochar directly to the roots helps them get off to a strong start and supports healthy growth.
It’s also a natural way to improve a lawn’s look and performance. To add biochar to your lawn to prepare for warm weather, spread it evenly across the grass, either by hand or with a broadcast spreader for larger areas. Aim for a thin, even layer to ensure all parts of your lawn benefit from its properties, improving long-term soil health. For newly planted lawns, mix 1 cubic foot of biochar into every 100 square feet of soil, making sure it penetrates 2-4 inches deep.
No matter where you use biochar, water regularly for the first week to activate its benefits. Watering helps biochar settle into the soil and start working, as its porous structure holds moisture, helping keep gardens and lawns hydrated.
Sustainable from the Ground Up
Not only does biochar deeply nourish your garden or lawn, it also helps create a more sustainable environment for years to come. It’s made by heating natural materials, such as organic wood waste, in a way that stores carbon rather than releasing it into the atmosphere as greenhouse gases.
The process – called pyrolysis – locks carbon into a stable form that doesn’t break down as quickly as mulch or compost and transforms into a light, porous material that stays active, season after season, to ensure nutrient-rich soil for years to come.
Beyond the Lawn
It isn’t just for providing plants with healthier soil. Bring biochar along on camping trips, as it also works wellfor composting toilets and has the added benefit of controlling odors and absorbing waste, making it a sustainable option that can be composted afterward.
It can also be used as livestock bedding as it absorbs liquids, neutralizes odors and can be mixed with manure to create a more nutrient-rich compost for plants and crops.
Learn more about planting healthy gardens and green spaces at WakefieldBiochar.com/grow.
Photo courtesy of Shutterstock (woman gardening)


SOURCE:
Wakefield BioChar
home gardening
A Guide to Growing Thriving Plants Indoors
This guide provides essential tips for successfully growing indoor plants. Key points include selecting plants suited to light conditions, ensuring proper watering and soil quality, using adequate pots, and nurturing plants with appropriate fertilizers during their active growth season. Following these steps can create a thriving indoor garden.
Last Updated on March 28, 2026 by Daily News Staff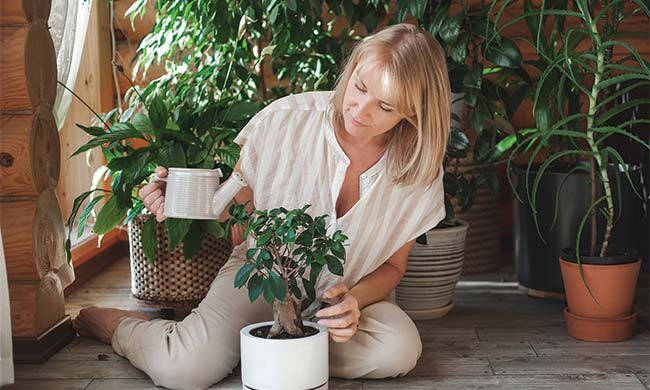
A Guide to Growing Thriving Plants Indoors
(Feature Impact) Lush greenery can add a sense of calm to many homes and bringing it indoors can help transform nearly any room into a relaxing oasis.
Whether you’re a seasoned plant parent or just beginning your indoor gardening journey, this guide can help you get started – and succeed in – growing healthy plants indoors.
Choose the Right Plants
Not all houseplants are created equal, and the first step toward a flourishing indoor garden is picking plants that align with your home’s conditions. If your home has several bright and sunny rooms, light-loving varieties will likely thrive. For shadier spots, look for low-light tolerant plants, which are often easier to care for and more forgiving.
Provide Adequate Light
Most houseplants prefer bright, indirect light – that soft glow when positioned just inside a window (and turned regularly for even light). However, some can tolerate lower light levels. If natural sunlight is limited where you live, consider grow lights that mimic the sun’s spectrum and help plants keep their color and strong growth without plenty of daylight.
Avoid Overwatering
Too much water can lead to root rot and is one of the most common mistakes even the most experienced gardeners make. Rather than watering on a strict schedule, check the soil first. If the top inch is dry, it’s usually time to give your plant a drink. Add warm or room-temperature water until you see moisture come out of the pot’s drainage holes then let the soil dry before watering again.
Consider the Soil, Pot and Growth Space
Use a high-quality potting mix designed for indoor plants along with pots featuring proper drainage. If you prefer decorative planters without holes, consider placing your plant in a smaller pot inside the decorative one to ensure proper drainage. As plants grow, they may need repotted to give their roots room to spread and continue healthy growth.
Nourish During the Growing Season
Plants use more nutrients in spring and summer, so feed them with a balanced, diluted fertilizer every 4-6 weeks during active months. In fall and winter, most indoor plants grow more slowly and need less feeding. Also remember to regularly prune dead or yellowing leaves to help plants focus on new growth.
Find more tips and guidance to help your indoor plants thrive at eLivingtoday.com.
Photo courtesy of Shutterstock
https://erp.featureimpact.com/api/v1/tracking/17789/10231/track.js (function () {
var image = new Image(1, 1);
image.src = ‘https://erp.featureimpact.com/api/v1/tracking/17789/10231/track.gif?referrer=’ + window.location.href;
image.id = ‘feature-impact-content-tracking-pixel’;
image.style.position = ‘absolute’;
image.style.top = 0;
image.style.left = 0;
document.body.appendChild(image);
})();
SOURCE:
(Feature Impact) As the days lengthen and warm air has you ready to get your patio furniture out of storage, that means it’s time to give your yard a fresh start. With a little planning now, you’ll be rewarded with a fuller, greener and easier-to-maintain outdoor space once spring is in full bloom.
1. Start With a Clean Slate
Winter leaves behind plenty of debris, including fallen branches and matted leaves. Before you start planting, take a walk around your yard and tidy up:
- Rake moisture-trapping twigs and leaves that can cause fungus
- Remove dead plants or spent annuals from flower beds
- Sweep or power wash patios and walkways
2. Tune Up Tools
Digging into yard work only to find rusty shears or a squeaky mower can prolong the task. Instead, ensure your tools are in good working order:
- Sharpen blades on lawn mowers, shears and pruners
- Install fresh string on trimmers and weed eaters
- Replace old fuel or clean air filters on gas-powered tools
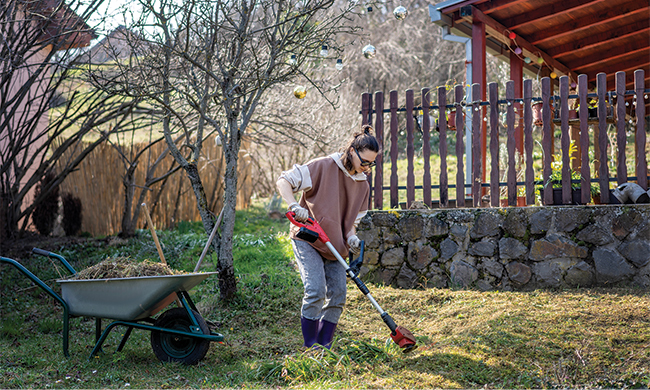
3. Assess Your Lawn
Early spring is ideal for noticing how winter treated your grass. Dethatching and aeration can go a long way toward helping grass absorb nutrients. Set the stage for lush growth once warmer weather arrives by looking for:
- Bare patches that need reseeding
- Weeds making an early debut
- Compacted soil where water pools instead of soaking in
4. Give Plants the Right Start
Now’s the time to prep beds for new life. Before you plant:
- Loosen soil and mix in compost for nutrients
- Add mulch around perennials
- Plan your planting based on sun and shade patterns
5. Hydrate Wisely
Strong roots start with proper hydration. Even before sprigs pop up, early spring can be dry as the sun gets higher. Remember to:
- Water flowerbeds if rainfall has been scarce
- Check irrigation systems for damage
- Mulch lightly after soil warms to lock in moisture
Getting your yard ready early in spring isn’t about perfection; it’s about setting yourself up for outdoor enjoyment all season long. Find more tips to get your yard in shape at eLivingtoday.com.
Photo courtesy of Shutterstock


SOURCE:
Our Lifestyle section on STM Daily News is a hub of inspiration and practical information, offering a range of articles that touch on various aspects of daily life. From tips on family finances to guides for maintaining health and wellness, we strive to empower our readers with knowledge and resources to enhance their lifestyles. Whether you’re seeking outdoor activity ideas, fashion trends, or travel recommendations, our lifestyle section has got you covered. Visit us today at https://stmdailynews.com/category/lifestyle/ and embark on a journey of discovery and self-improvement.